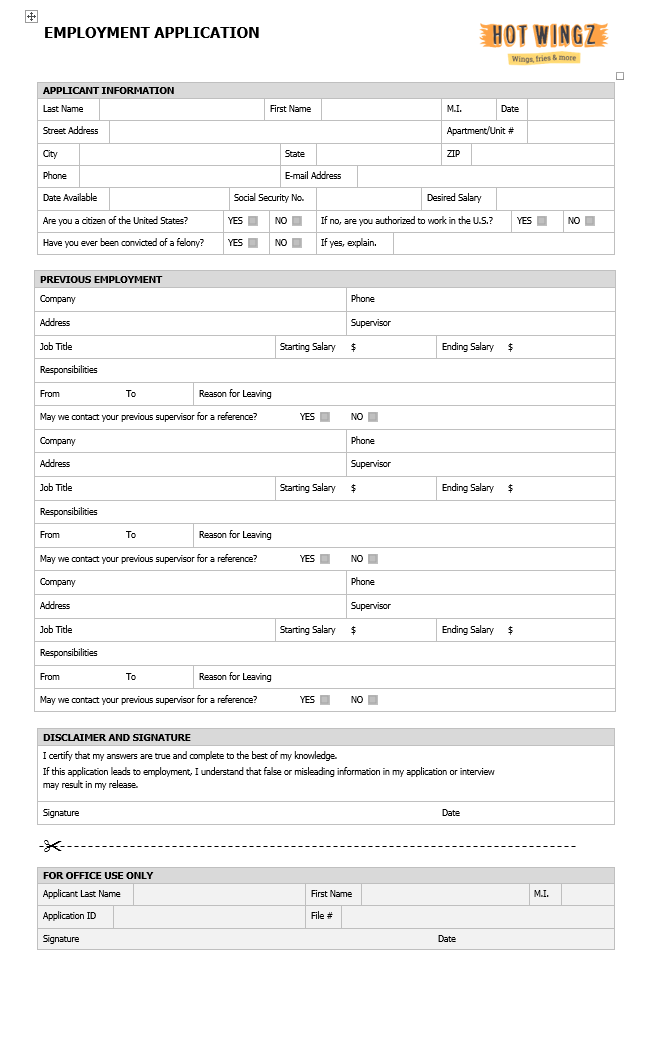
Word Challenges!
Word Challenge # 1
Challenge #1
- Open Word, and create a blank document.
- Change the Ribbon Display Options to Show Tabs.
- Using Customize Quick Access Toolbar, add New, Quick Print, and Spelling & Grammar.
- In the Tell me bar, type Shape and press Enter.
- Choose a shape from the menu, and double-click somewhere on your document.
- Show the Ruler if it is not already visible.
- Zoom the document to 120%.
- Change the Document view to Web Layout.
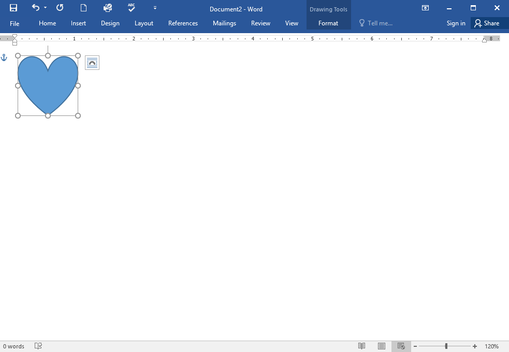
- When you're finished, your document should look something like below.
- E-mail me your final document, titled Challenge #1.
- Change the Ribbon Display Options back to Show Tabs and Commands, and change the Document View back to Print Layout.
Word Challenge # 2
Challenge#2
- Open the practice document below.
- Scroll to page 2.
- Place the insertion point at the top of the document and type Now Introducing...
- Use your arrow keys to move the insertion point to the Signature Detail Plan's price and change it to $99.99/mo.
- At the bottom of the document, use drag and drop to move Just leave the details to us to the end of the last line.
- At the end of the line you just moved, insert the trademark symbol. If you cannot find the trademark symbol, insert a different symbol of your choice.
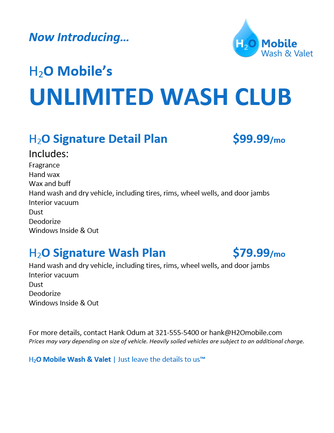
- When you're finished, your document should look something like this:
- E-mail me your final document, titled Challenge #2.
|
| ||
Word Challenge # 3
Challenge #3
- Open the practice document.
- Scroll to page 2.
- Select the words For Rent and change the font size to 48 pt.
- With the text still selected, change the font to Franklin Gothic Demi. Note: If you don't see this font in the menu, you can select a different one.
- Use the Change Case command to change For Rent to UPPERCASE.
- Change the color of the words For Rent to Gold, Accent 4.
- Remove the highlight from the phone number (919-555-7237).
- Select all of the text from For Rent to (919-555-7237) and Center Align.
- Italicize the text in the paragraph below About Villa Piña.
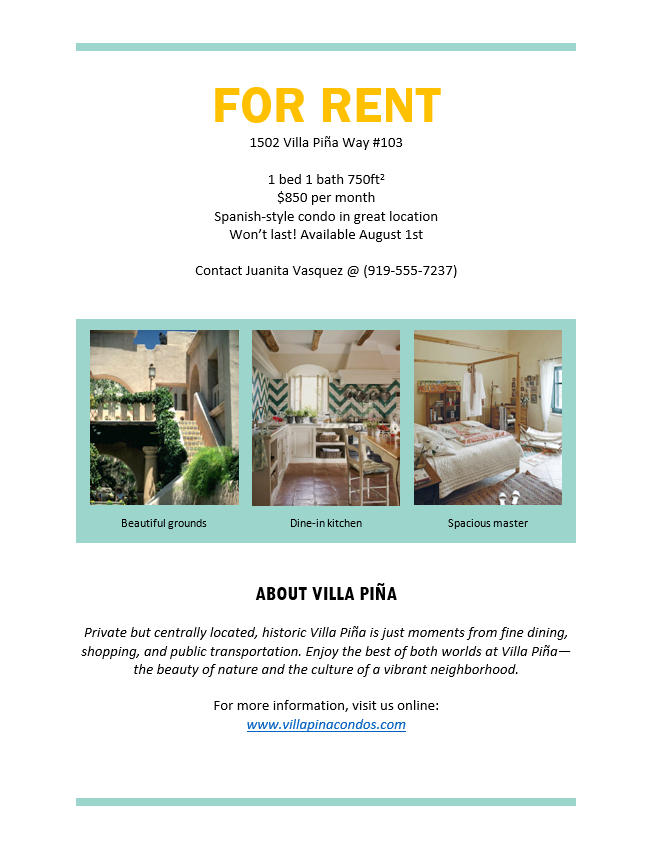
- When you're finished, your page should look like this:
- E-mail me your final document, titled Challenge #3.
|
| ||
Word Challenge # 4
Challenge #4
- Open our practice document.
- Using the Find feature, determine which pages mention Caroline Gordon.
- The name T.S. Eliot is misspelled. Replace all instances of Elliot with Eliot. When you're finished, you should have made three replacements.
- Allen Tate's name is also misspelled. Find and Replace Alan with Allen. Hint: Do not use Replace All. Otherwise, you might accidentally replace the word balance.
- E-mail me your final document, titled Challenge #4.
| 4word2016_findreplace_practice.docx |
Word Challenge # 5
Challenge #5
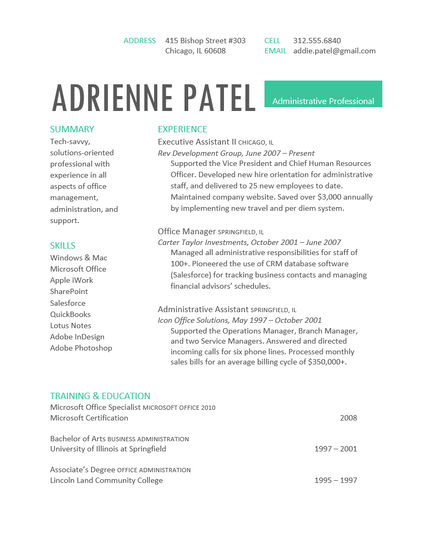
- Open the practice document.
- Use the Tab key to indent the beginning of each paragraph in the body of the cover letter. These start with I am exceedingly interested, While working toward, and Enclosed is a copy.
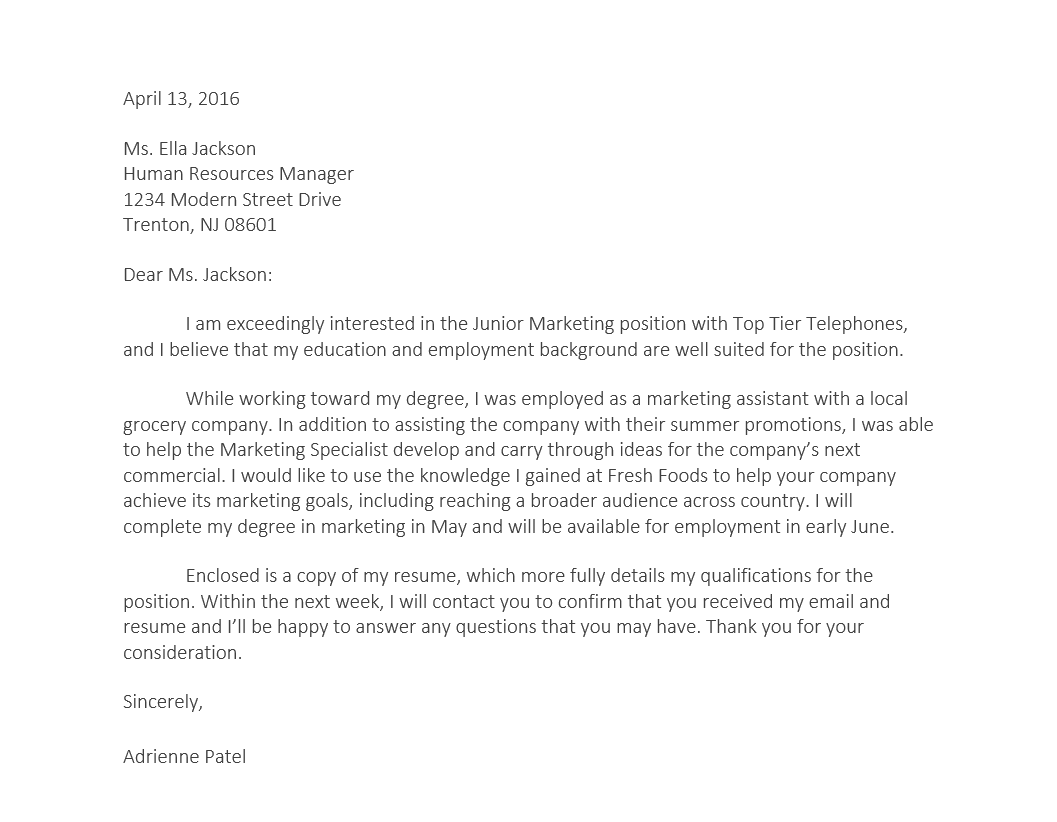
- When you're finished, the first page should look like this:
4. When you're finished, the first page should look like this:
5. Scroll to page 2.
6. Select all of the text below Training & Education on page 2.
7. Place a right tab at the 6" (15.25 cm) mark.
8. Insert your cursor before each date range, then press the Tab key. These dates include 2008, 1997-2001, and 1995-1997.
9. Select each job description under the Experience section and move the Left Indent to the 0.25" (50 mm) mark.
10. When you're finished, page 1 should look something like this:
11. E-mail me your final document, titled Challenge #5.
|
| ||
Word Challenge # 6
Challenge #6
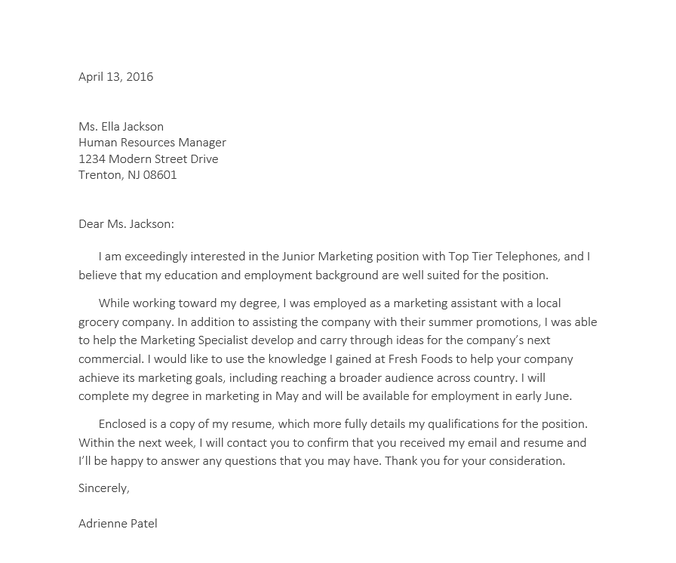
- Open the practice document.
- Select the the date and the address block. This starts with April 13, 2016, and ends with Trenton, NJ 08601.
- Change the spacing before the paragraph to 12 pt and the spacing after the paragraph to 30 pt.
- Select the body of the letter. This starts with I am exceedingly and ends with your consideration.
- Change the line spacing to 1.15.
- When you're finished, your page should look like this:
- E-mail me your final document, titled Challenge #6.
|
| ||
Word Challenge # 7
Challenge #7
- Open the practice document.
- Scroll to page 3.
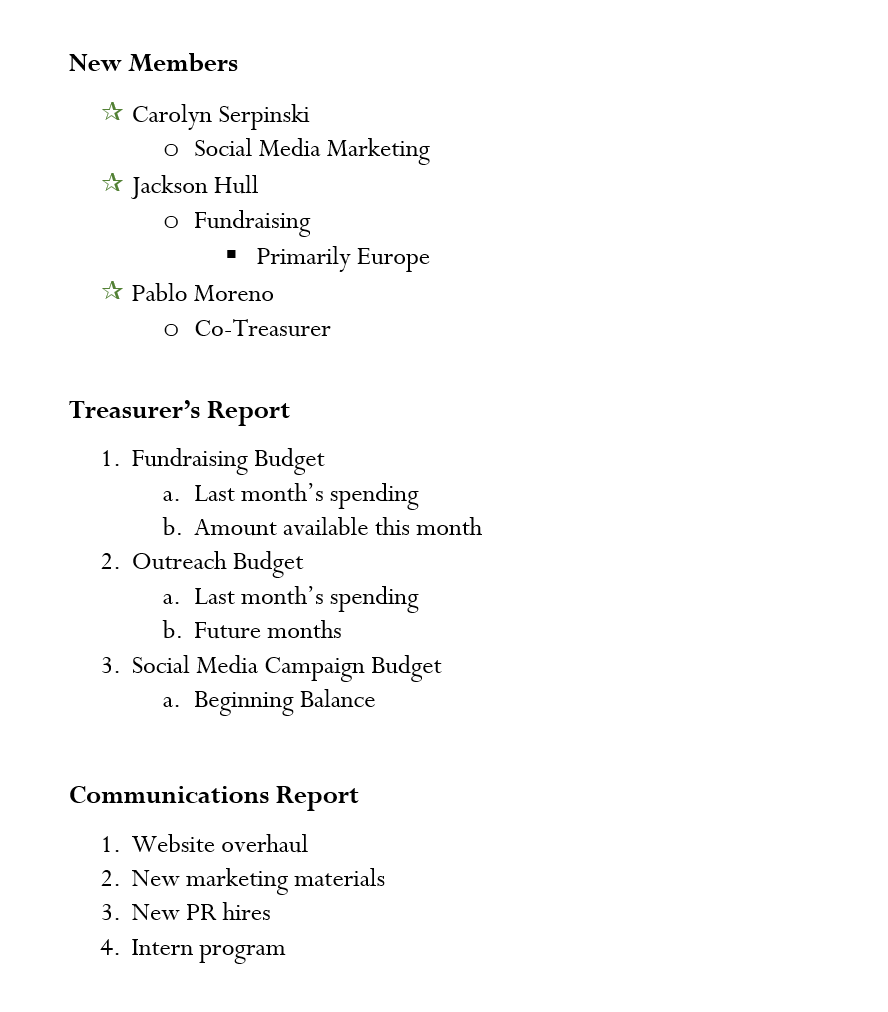
- Select the text under New Members starting with Carolyn and ending with Co-Treasurer, and format it as a bulleted list.
- With the text still selected, use the Define New Bullet dialog box to change the bullets to a green star. Hint: You can find a star in the Wingdings font.
- Increase the indent level by 1 for the lines Social Media Marketing, Fundraising, and Co-Treasurer.
- Increase the indent level by 2 for the line Primarily Europe.
- In the Treasurer's Report list, decrease the indent level by 1 for the line Amount available this month.
- In the Communications Report list, restart the numbering at 1.
- When you're finished, your page should look something like this:
- E-mail me your final document, titled Challenge #7.
|
| ||
Word Challenge # 8
Challenge #8
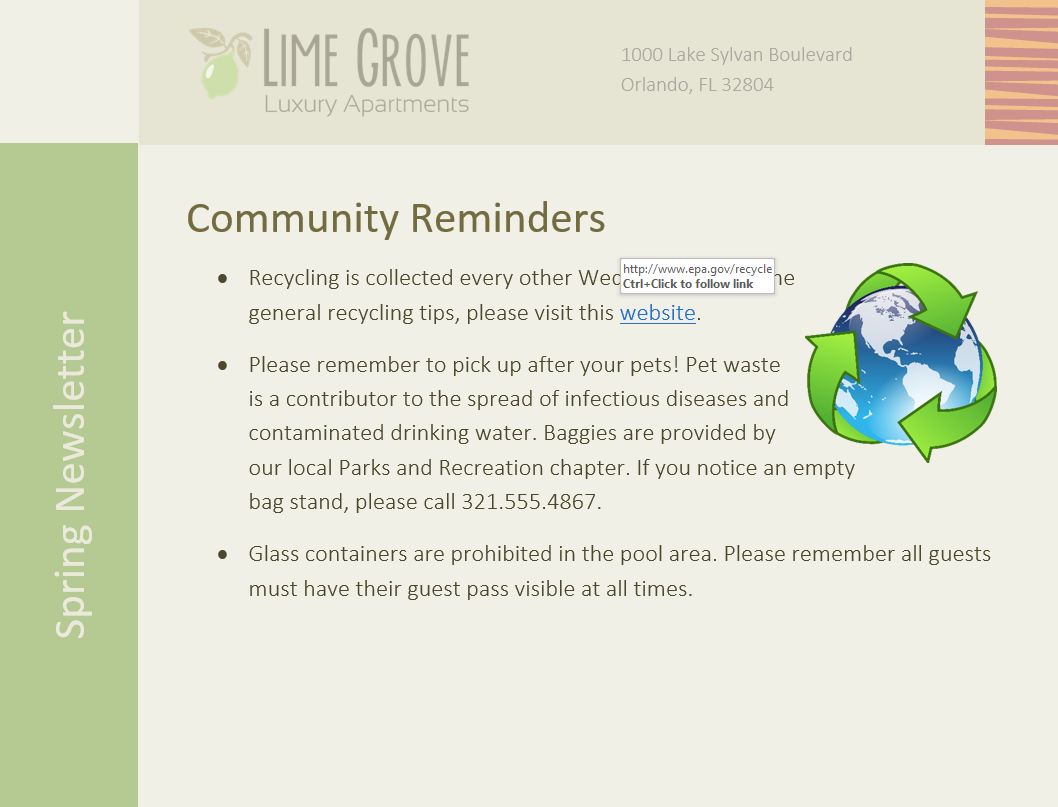
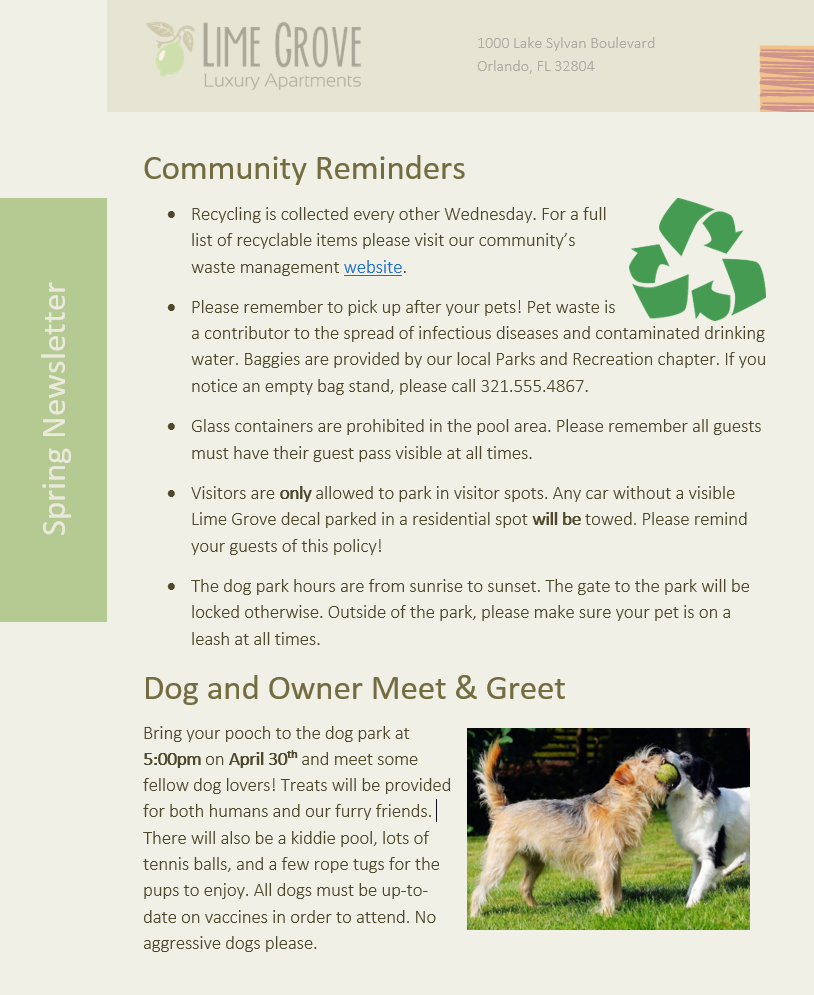
- Open the practice document.
- Scroll to page 4.
- In the first bullet point under Community Reminders, format the word website as a hyperlink to http://www.epa.gov/recycle.
- Test your hyperlink to make sure it works.
- In the second bullet point, remove the hyperlink from the words Parks and Recreation.
- When you're finished, your page should look something like this
- E-mail me your final document, titled Challenge #8.
|
| ||
Word Challenge # 9
Challenge #9
- Open the practice document.
- Change the page orientation to Portrait.
- Change the page size to Legal. If Legal size is not available, you can choose another size such as A5.
- Change the margins to the Narrow setting.
- When you're finished, your document should be one page if using Legal size. It should look something like this:
- E-mail me your final document, titled Challenge #9.
|
| ||
Word Challenge # 10
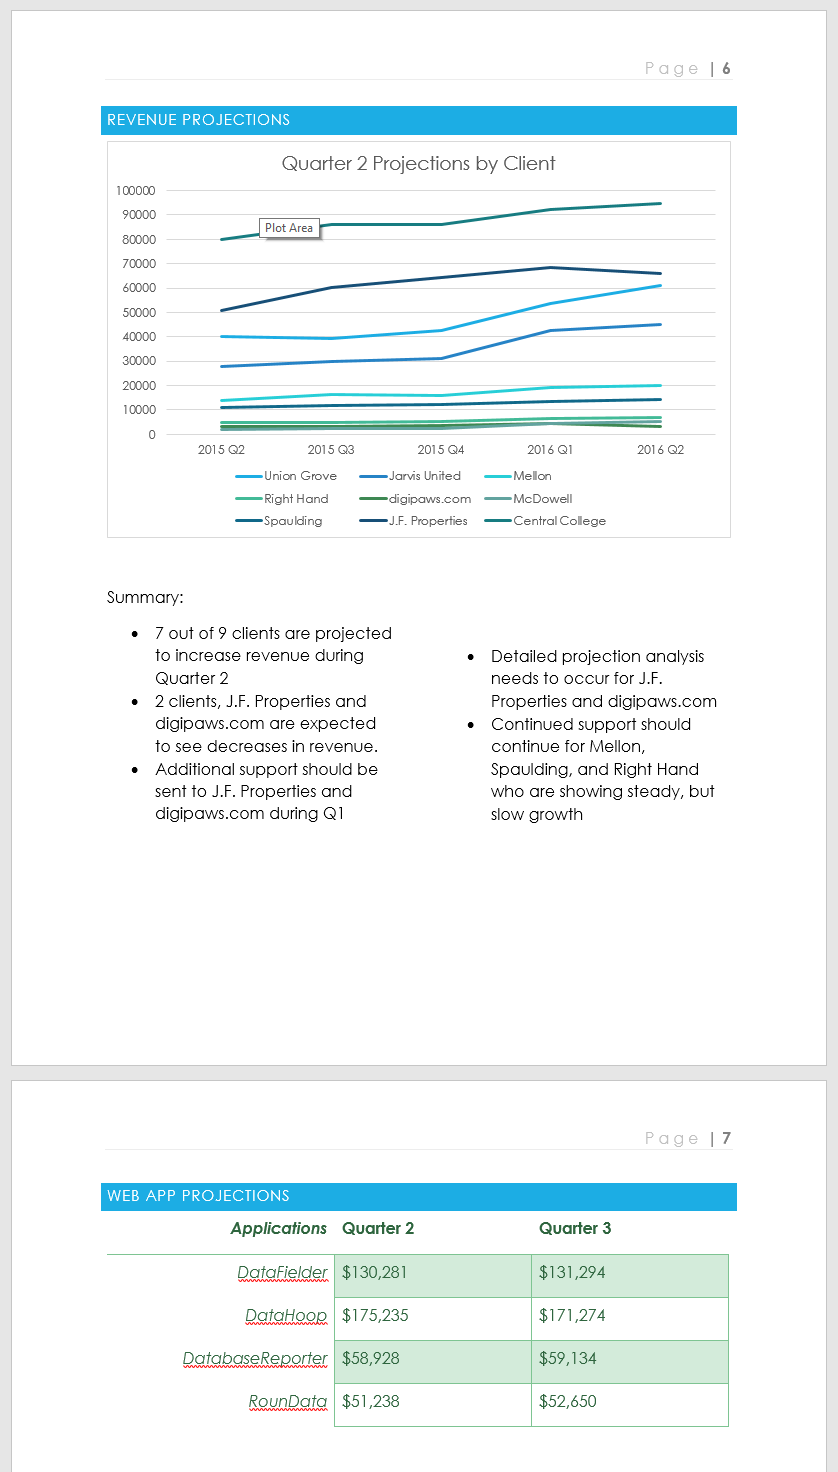
Challenge #10
- Open the practice document.
- Scroll to the Revenue Projections section near the end of the document.
- Remove the page break after the Quarter 2 Projections by Client chart.
- Place your cursor at the beginning of the header Web App Projections.
- Insert a Next Page section break.
- In the Page Setup group on the Layout tab, click the Columns drop-down menu and choose One. This formats the page back to one column and should allow the Web App Projections header and the table below it to span across the page. You will learn more about columns in our next lesson.
- When you're finished, the last two pages should look something like this:
- E-mail me your final document, titled Challenge #10.
|
| ||
Word Challenge # 11
Challenge #11
- Open the practice document.
- Scroll to page 3.
- Select all of the text in the bulleted list below Community Reminders and format it as two columns.
- Place your cursor at the beginning of the fourth bullet in front of the word Visitors.
- Insert a column break.
- When you're finished, your page should look something like this:
- E-mail me your final document, titled Challenge #11.
|
| ||
Word Challenge # 12
Challenge #12
- Open the practice document. If you've already downloaded our practice document in order to follow along with the lesson, be sure to download a fresh copy by clicking the link in this step.
- Open the header.
- Choose Align Right on the Home tab and type your name.
- Below your name, use the Date & Time command on the Design tab and insert the date. You can use whichever format you like.
- In the footer section, insert the preset footer Grid.
- Close the header and footer.
- When you're finished, your page should look something like this:
- E-mail me your final document, titled Challenge #12.
|
| ||
Word Challenge # 13
Challenge #13
- Open the practice document.
- On page 1, insert the Accent Bar 4 page number at the Bottom of page.
- In the Design Options, choose Different First Page. The page number should now be hidden on the first page.
- Scroll to page 27 of the document.
- Place your cursor at the beginning of the title Works Cited and insert a Continuous Section break.
- In the footer of page 27, restart the page numbering at 1.
- When you're finished, the bottom of page 27 should look like this:
- E-mail me your final document, titled Challenge #13.
|
| ||
Word Challenge # 14
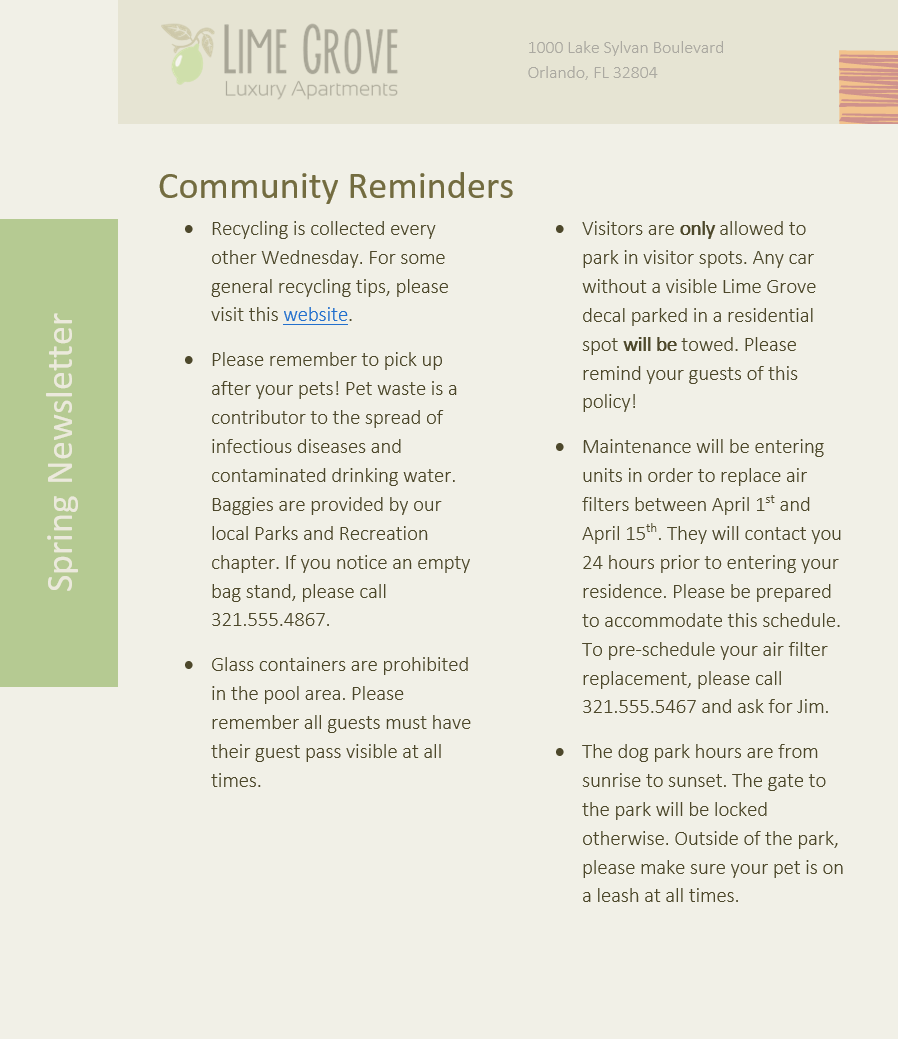
Challenge #14
- Open the practice document and scroll to page 3.
- Change the text wrapping of the dog picture to Square.
- Drag the picture to the right side of the bottom paragraph.
- Place your insertion point next to the Community Reminders heading.
- Use the Online Pictures command and type the word Recycle into the search.
- Insert a recycling symbol.
- If needed, use the corner sizing handle to resize the recycling symbol so everything fits on page 3.
- Change the text wrapping to Square and drag the symbol to the right side of the first bullet.
- When you're finished, page 3 should look something like this:
- E-mail me your final document, titled Challenge #14.
|
| ||
Word Challenge # 15
Challenge #15
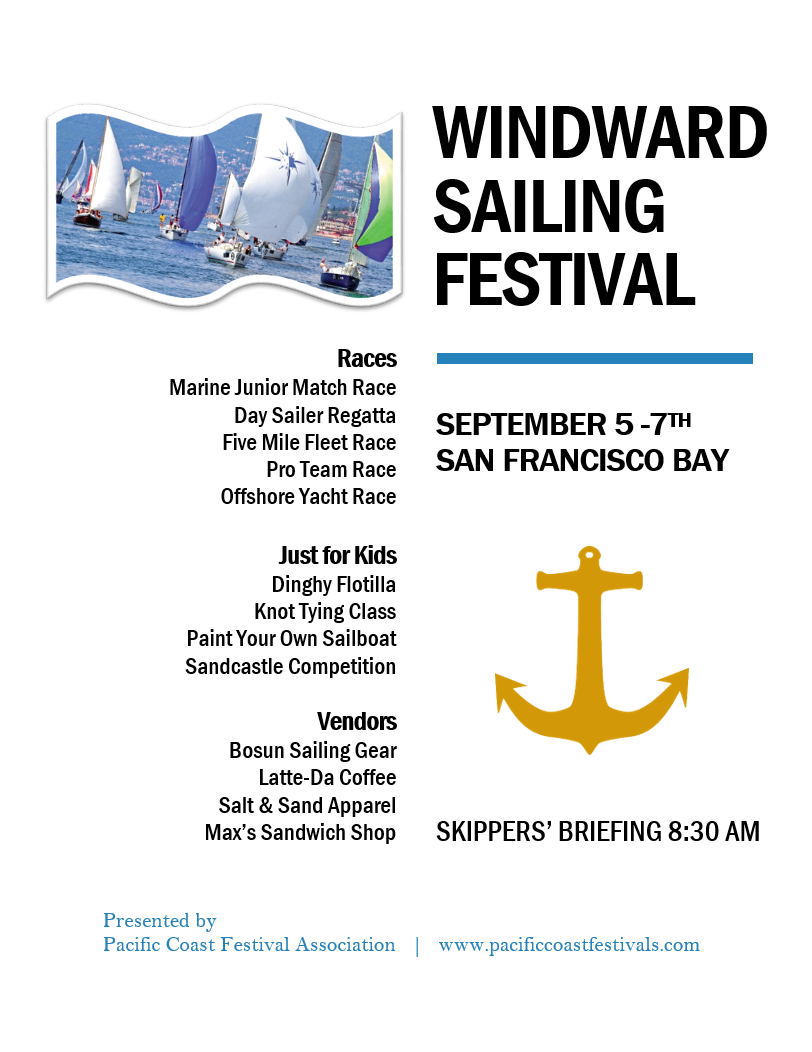
- Open the practice document.
- Scroll to page 2 and select the picture of the sailboats.
- In the Format tab, change the style to Simple Frame, White.
- With the picture still selected, use Crop to Shape and crop to the Double Wave shape in the Stars and Banners category. Hint: The shape names will appear when you hover over them.
- Select the picture of the anchor.
- In the Format tab, use the Color drop-down menu to recolor the anchor to Gold, Accent color 2 Light.
- When you're finished, your page should look like this:
- E-mail me your final document, titled Challenge #15.
|
| ||
Word Challenge # 16
Challenge #16
- Open the practice document.
- On the right side of the page, insert a cloud shape from the Basic shapesgroup. Hint: Shape names appear when you hover over them.
- Change the shape outline to gray.
- Change the shape fill to white.
- Under the Shape Effects drop-down menu, add a Circle Bevel.
- On top of the cloud, insert a Sun shape from the Basic shapes group.
- Change the shape style to your choice of a Gold style. Hint: Style names appear when you hover over them. Make sure the style name has the word Gold in it.
- Send the sun shape backward so it is behind the cloud shape.
- If needed, move the cloud shape so the sun is peeking out from behind it.
- When you're finished, your image should look something like this:
- E-mail me your final document, titled Challenge #16.
|

| ||
Word Challenge # 17
Challenge #17
- Open the practice document.
- Insert a Simple Text Box.
- In the text box, type Get an additional 25% off when you mention this ad!
- Change the font to Gadugi, 20 pt, Center Align.
- Change the shape of the text box to Double Wave from the Stars and Banners group.
- Change the text box style by selecting any style in the Intense Effect row.
- Drag the text box to the space below Buy 1, Get 1 Free* and Formalwear.
- When you're finished, your document should look something like this:
- E-mail me your final document, titled Challenge #17.
|

| ||
Word Challenge # 18
Challenge #18
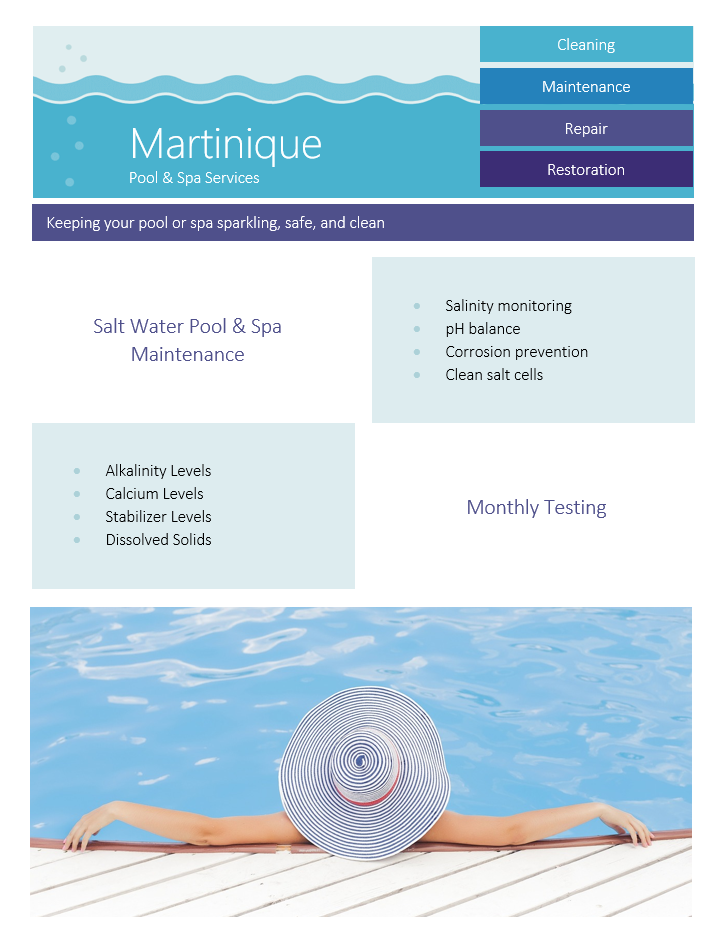
- Open the practice document.
- Scroll to page 2 and select the picture of the waves at the top of the page.
- Use the Rotate command to flip the waves vertically.
- Use the Send to Back command to move the waves behind the Martinique text box.
- Move the Martinique text box so it is near the bottom of the waves image.
- Make sure the waves picture and Martinique text box are no longer selected. Hold down the Shift key, then select the text boxes containing Cleaning,Maintenance, Repair, and Restoration.
- Click the Align command, and make sure the Align Selected Objectsoption is selected. Select Align Right and Distribute Vertically.
- With the text boxes still selected, group them.
- When you're finished, your page should look something like this:
- E-mail me your final document, titled Challenge #18.
|
| ||
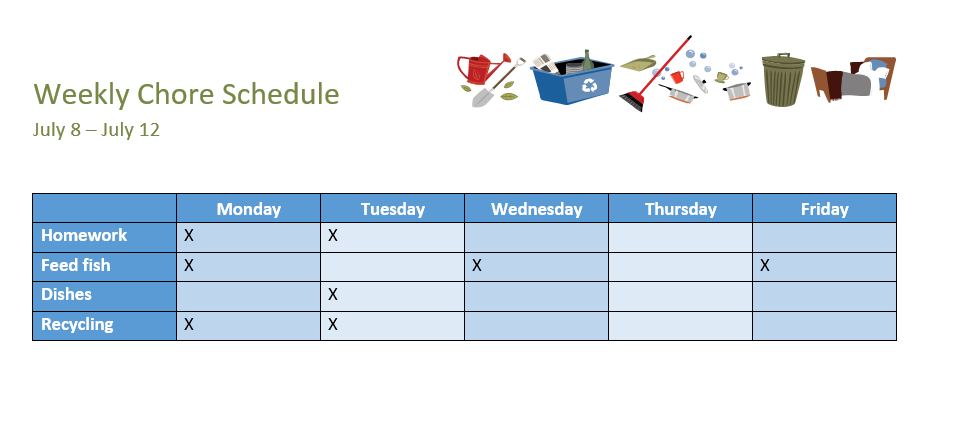
Word Challenge # 19
Challenge #19
- Open the practice document.
- Scroll to page 3 and select all of the text below the dates July 8 - July 12.
- Use the Convert Text to Table to insert the text into a 6-column table. Make sure to Separate text at Tabs.
- Delete the Saturday column.
- Insert a column to the left of the Friday column and type Thursday in the top cell.
- Change the table style to any style that begins with Grid Table 5. Hint: Style names appear when you hover over them.
- In the Table Style Options menu, uncheck Banded Rows and check Banded Columns.
- Select the entire table. In the Borders drop-down menu, choose All Borders.
- With the table still selected, increase the table row height to 0.3" (0.8 cm).
- Select the first row and change the cell alignment to Align Center.
- When you're finished, your table should look something like this:
- E-mail me your final document, titled Challenge #19.
|
| ||
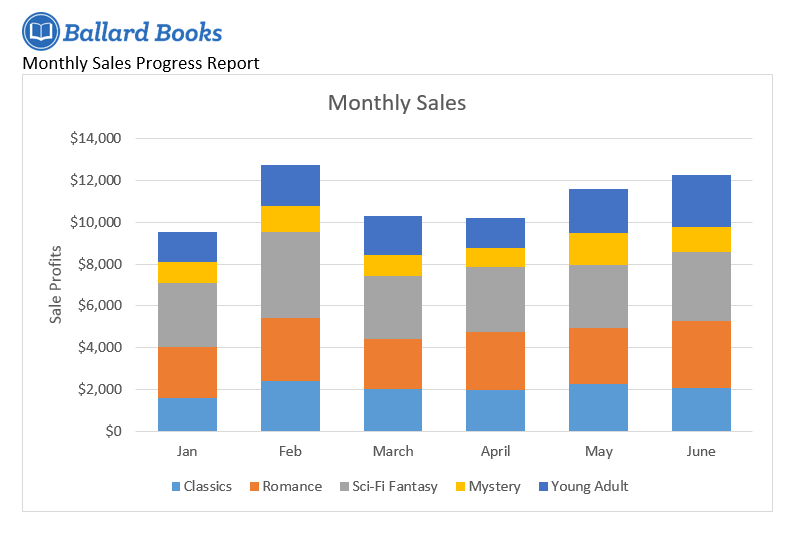
Word Challenge # 20
Challenge #20
- Open the practice document. You will also need to download our practice workbook.
- Insert a Line chart into our practice Word document.
- Open our practice workbook in Excel. Copy the data and paste it into the chart's spreadsheet.
- Change the chart title to Monthly Sales.
- Change the chart type to Stacked Column.
- Use the Quick Layout drop-down menu to change to Layout 3.
- Use the Add Chart Element drop-down menu to add a Primary Vertical Axis Title.
- Double-click the axis title, then rename it Sale Profits.
- Switch the Row/Column data.
- When you're finished, your chart should look something like this:
- E-mail me your final document, titled Challenge #20.
|
| ||||
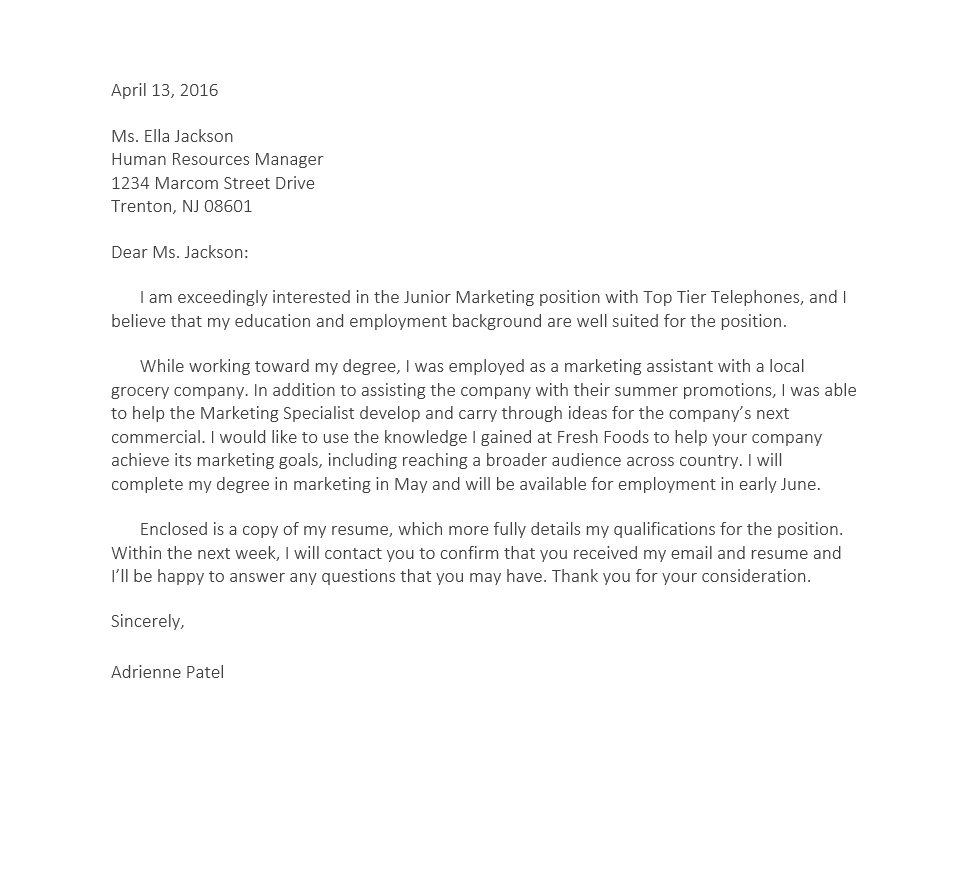
Word Challenge # 21
Challenge #21
- Open the practice document. If you already downloaded our practice document in order to follow along with the lesson, be sure to download a fresh copy by clicking the link in this step.
- Run a Spelling & Grammar check.
- Ignore the spelling of names like Marcom.
- Correct all other spelling and grammar mistakes.
- When you're finished, your document should look like this:
- E-mail me your final document, titled Challenge #21.
|
| ||
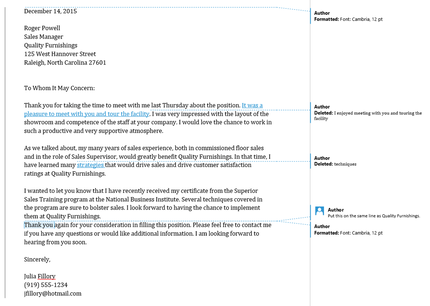
Word Challenge # 22
Challenge #22
- Open the practice document.
- Turn on Track Changes and show All Markup.
- In the Tracking group, choose Show Revisions in Balloons.
- In the first paragraph, edit the second sentence so it reads It was a pleasure to meet with you and tour the facility.
- In the second paragraph, change the word techniques to strategies.
- Change the font of the letter to Cambria, 12 pt.
- In the third paragraph, select the words Thank you and insert a commentthat says Put this on the same line as Quality Furnishings.
- At this point, your letter should look something something like this (Note:The markup color may vary):
- E-mail me your final document, titled Challenge #22.
|
| ||
Word Challenge # 23
Challenge #23
- Open the practice document. If you opened our practice document in order to follow along with the lesson, be sure to download a fresh copy by clicking the link again.
- Use Document Inspector to check and remove any hidden information.
- Protect the document by marking it as final.
- When you're finished, the top of your page should look something like this:
- E-mail me your final document, titled Challenge #23.
|

| ||
Word Challenge # 24
Challenge #24
- Open a blank document.
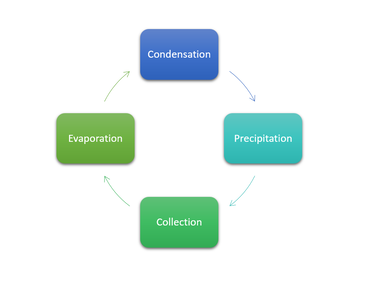
- Insert a Basic Cycle SmartArt graphic from the Cycle category.
- Insert the following text in clockwise order: Condensation, Evaporation,Infiltration, Precipitation, Collection.
- Delete the shape containing the word Infiltration.
- Select the shape containing Evaporation, and click the Move Downcommand twice to move the shape between Collection and Condensation.
- Change the SmartArt Layout to Block Cycle.
- Change the colors of the SmartArt to a range of your choice.
- Change the SmartArt Style to Intense Effect.
- When you're finished, your SmartArt should look like this:
- E-mail me your final document, titled Challenge #24.
Word Challenge # 25
Challenge #25
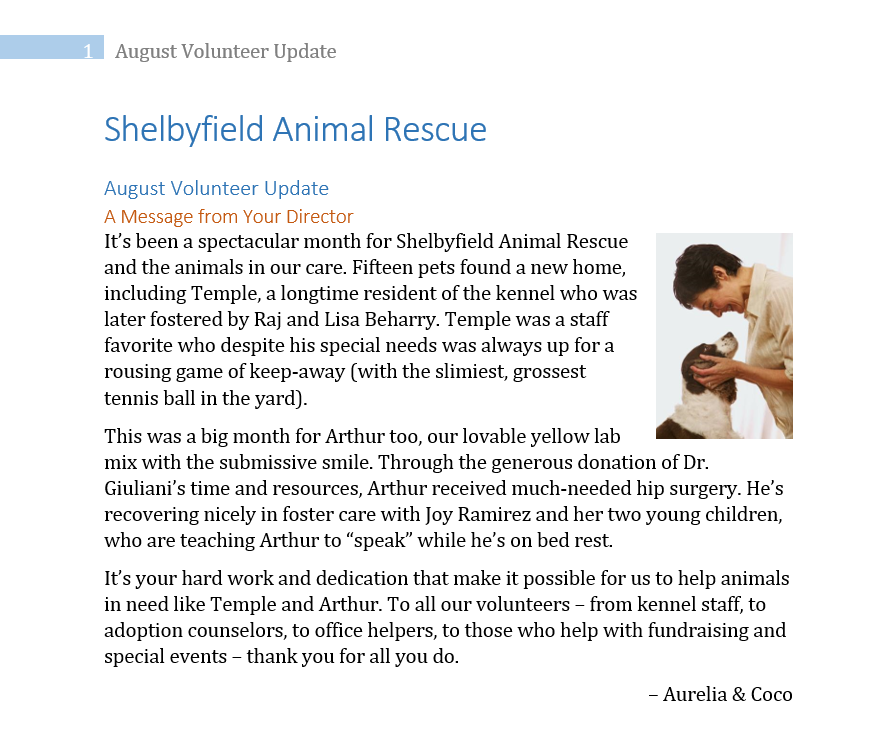
- Open the practice document. If you already downloaded our practice document, be sure to download a fresh copy by clicking the link again.
- On page 1, select the first line of text Shelbyfield Animal Rescue and change the style to Title.
- Select the second line that says August Volunteer Update and change the style to Heading 1.
- Select the third line that says A Message From Your Director and change the style to Heading 2.
- In the Design tab, change the style set to Casual.
- Modify the Normal style so the font is Cambria and the font size is 14 pt.
- When you're finished, the first page of your document should look like this:
- E-mail me your final document, titled Challenge #25.
|
| ||
Word Challenge # 26
Challenge #26
- Open the practice document and practice recipient list.
- Use the Mail Merge Wizard to merge the letter with the recipient list.
- Insert an address block at the top of the document. Choose the second format: Joshua Randall Jr.
- Above the body of the letter, insert a Greeting Line. Format the greeting line so it says Mr. Joshua Randall,
- Check your letters to make sure they are formatted correctly. Your third letter should look something like this:
- E-mail me your final document, titled Challenge #26.
- Complete the merge.
|
| ||||