PowerPoint Challenges!
PowerPoint Challenge #1
- Open our practice presentation.
- Change the theme of the presentation.
- Delete slide 7. This slide should be blank.
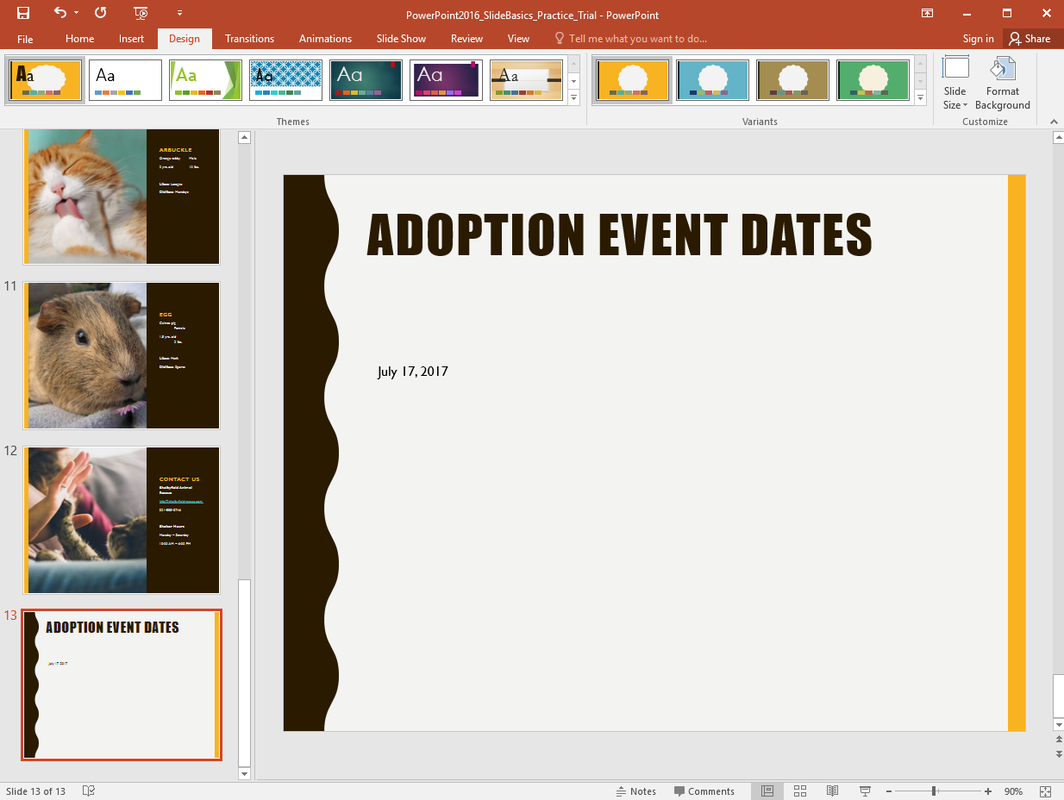
- Add a new slide with the Title and Content layout to the end of the presentation.
- In the Title placeholder, type Adoption Event Dates.
- Select the Content placeholder and delete it.
- Insert a text box and type July 17, 2017, inside it.
- Change the slide size to Standard (4:3). A dialog box will appear asking if you want to maximize or ensure fit. Choose Ensure Fit.
- When you're finished, your presentation should look something like this:
- E-mail me your final document, titled PPoint Challenge #1.
|
| ||
PowerPoint Challenge #2
- Open our practice presentation.
- Select slide 4.
- Use cut and paste or drag and drop to move the text Lower blood pressure between Companionship and Social opportunities.
- Select the list of benefits and add italics.
- Select the text Did you Know?, remove the boldface, and change the size to 36pt.
- When you're finished, your slide should look like this:
- E-mail me your final document, titled PPoint Challenge #2.
|

| ||
PowerPoint Challenge #3
- Open our practice presentation.
- Apply the Gallery theme, which has a light background with a wood texture at the bottom. Note: Theme names will appear when you hover over them.
- Select a variant of the theme.
- Here is an example of what your presentation might look like:
- E-mail me your final document, titled PPoint Challenge #3.
|

| ||
PowerPoint Challenge #4
- Open our practice presentation.
- With the first slide selected, apply a Push transition from the Subtle category.
- Change the Effect Options to push From Right.
- Change the Duration to 2.00.
- Set the slides to Automatically Advance after 3 seconds, or 00:03.00.
- Use the Apply to All command to apply your changes to every slide.
- Using the Slide Show button at the bottom of your window, play your slideshow. Each slide should advance automatically like in the image below:
- E-mail me your final document, titled PPoint Challenge #4.
|

| ||
PowerPoint Challenge #5
- Open our practice presentation. If you already downloaded our practice presentation to follow along with the lesson, be sure to download a fresh copy.
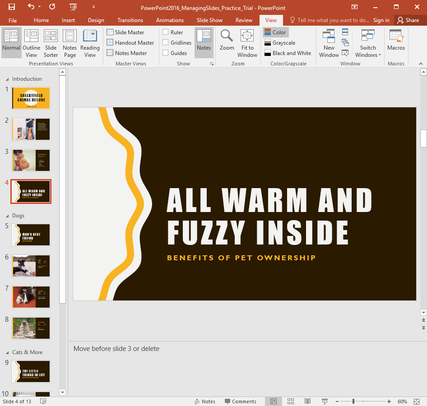
- Select the first slide and create a section.
- Rename the section Introduction.
- Select the slide titled Man's Best Friend and create a section named Dogs.
- Select the slide titled The Little Things In Life and create a section named Cats & Other.
- Move the slide titled Pogo so it's in the Dogs section.
- Change to Outline view.
- Create a note on slide 4 that says Move before slide 3 or delete.
- Switch back to Normal view.
- When you're finished, your presentation should look something like this:
- E-mail me your final document, titled PPoint Challenge #5.
|
| ||
PowerPoint Challenge #6
- Open our practice presentation.
- There is a typo in the presentation. Fundraising is misspelled as Funraising. Use the Find feature to find the misspelled word and Replace it with Fundraising.
- Use the Find feature to find out in which month elections were held. Hint: Search for the word elections.
- Let's say the original Fundraising Chair has resigned and been replaced. Use Find and Replace All to change Julia Stevens to Belinda Haygood.
- When you're finished, your presentation should have this dialog box:
- E-mail me your final document, titled PPoint Challenge #6.
|

| ||
PowerPoint Challenge #7
- Open our practice presentation.
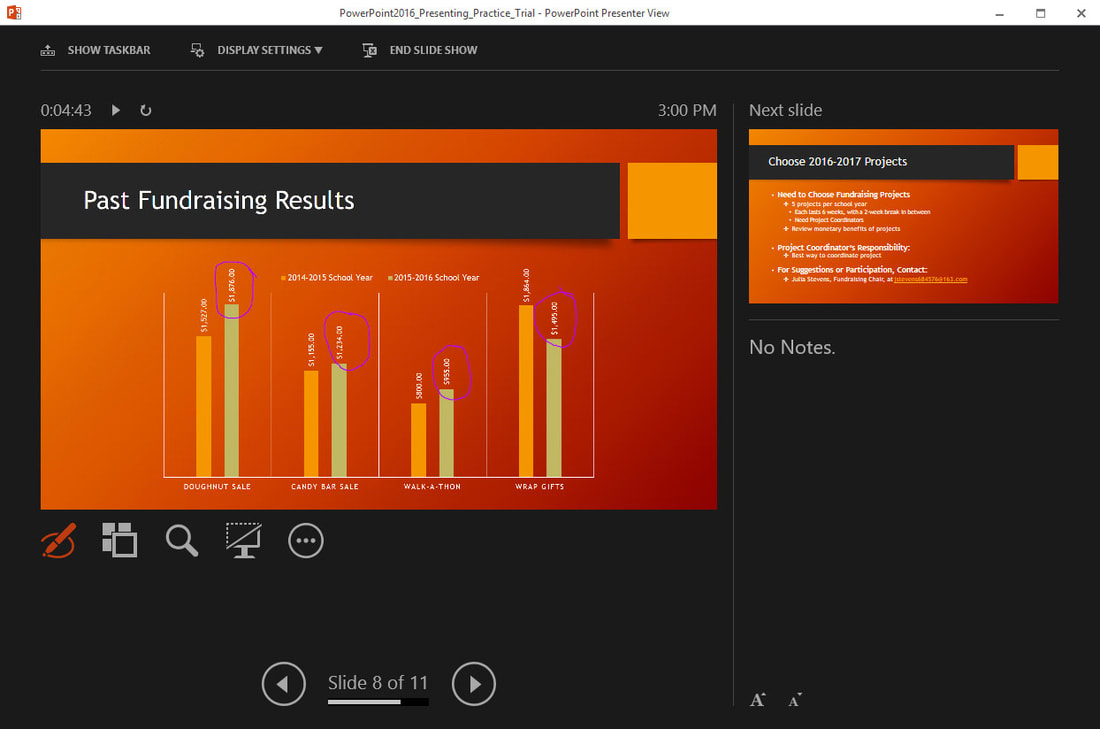
- In the Set Up Slide Show options, change the pen color to purple.
- Start your slideshow, then access Presenter view.
- Advance to slide 8.
- Use the pen tool to circle the fundraising amounts for the 2015-2016 school year. These are the amounts over the green bars.
- When you're finished, your screen should look something like this:
- E-mail me your final document, titled PPoint Challenge #7.
|
| ||
PowerPoint Challenge#8
- Open our practice presentation.
- On the last slide, select all of the text in the bulleted list.
- Customize the bullets with the symbol of your choice.
- Change the bullet color to Olive Green.
- Change the bullet size to 115% of the text.
- When you're finished, your slide should look something like this (your symbol may vary):
- E-mail me your final document, titled PPoint Challenge #8.
|
| ||
PowerPoint Challenge #9
- Open our practice presentation.
- On the last slide, select the entire bulleted list and change the line spacing options to 12 pt before and 0 pt after.
- Indent the second bullet to make it a subtopic under the first bullet.
- Show the Ruler if it's not already visible.
- For each subtopic, select it and drag the left indent marker to 1 inch (or 2.5 cm). Note: These are the bullets that do not begin with times.
- When you're finished, your slide should look something like this:
- E-mail me your final document, titled PPoint Challenge #9.
|
| ||
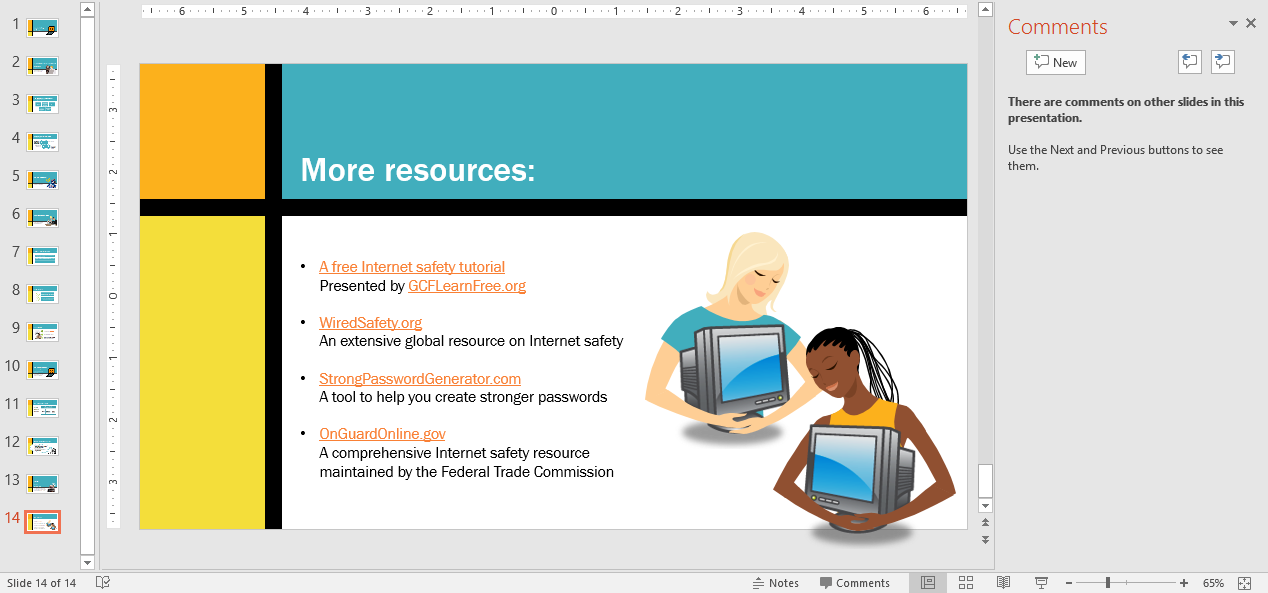
PowerPoint Challenge #10
- Open our practice presentation.
- Select the last slide.
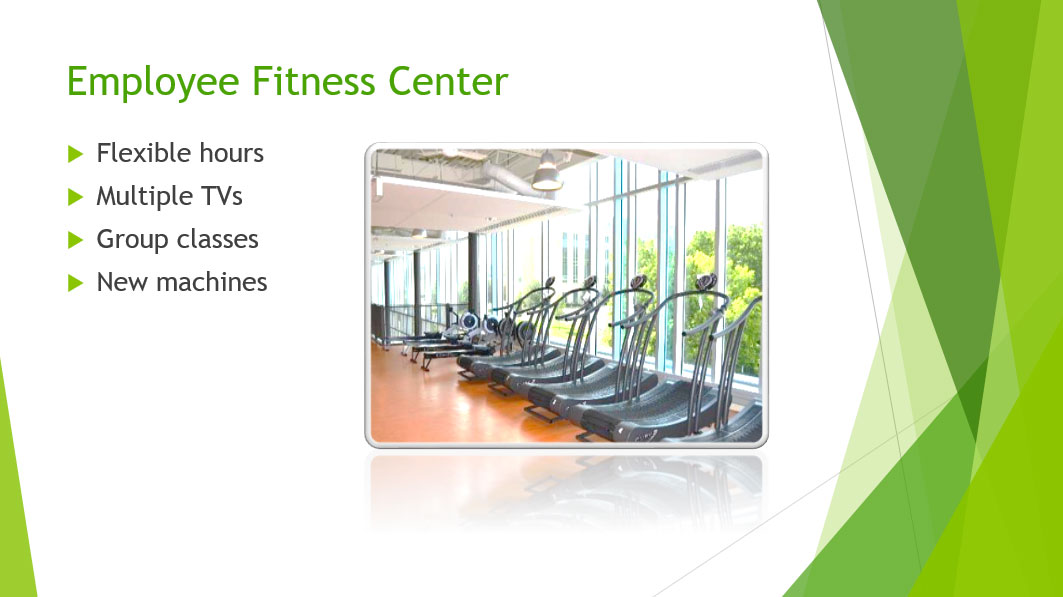
- Use the Online Pictures command to insert a picture of your favorite form of exercise.
- Resize your picture so it takes up a majority of the slide without covering the title.
- When you're finished, your slide should look something like this:

6. Insert a new slide with a Title Only layout.
7. In the Title placeholder, type Learn More at Fitness.gov.
8. Open http://www.fitness.gov in your browser, then insert a screen clipping of the website onto the slide you just created.
9. When you're finished, your slide should look something like this:
10. E-mail me your final document, titled PPoint Challenge #10.
PowerPoint Challenge #11
- Open our practice presentation.
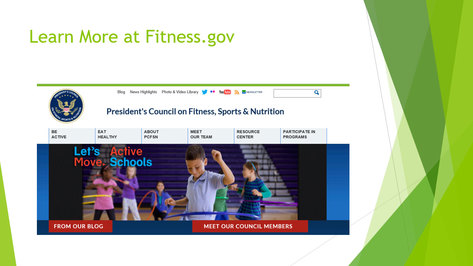
- On slide 7, select the treadmill picture.
- Crop the picture so it's slightly smaller and the treadmills take up the majority of the frame.
- Change the style of the picture.
- Apply a correction to the picture. For example, increase the brightness.
- Compress your picture and choose Email as your target output.
- When you're finished, your slide should look something like this:
- E-mail me your final document, titled PPoint Challenge #11.
|
| ||
PowerPoint Challenge #12
- Open our practice presentation.
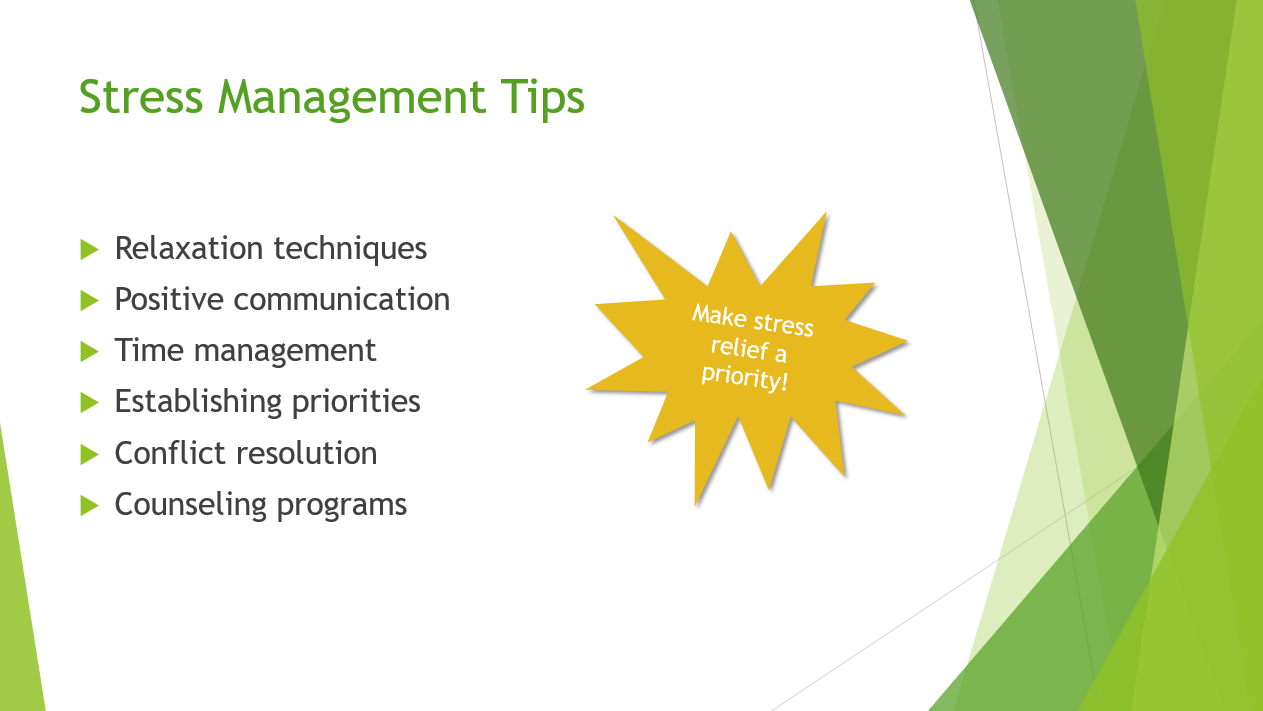
- On slide 5, titled Stress Management Tips, insert a Folded Corner shapefrom the Basic Shapes category.
- Rotate the shape slightly.
- Change the shape fill to gold.
- Change the shape outline to No Outline.
- Use shape effects to add a shadow from the Outer category.
- Add the following text to the shape: Make stress relief a priority!
- Change the shape to one of your choice. Note: You may have to resize the shape in order to see all of the text.
- When you're finished, your slide should look something like this:
- E-mail me your final document, titled PPoint Challenge #12.
|
| ||
PowerPoint Challenge #13
- Open our practice presentation.
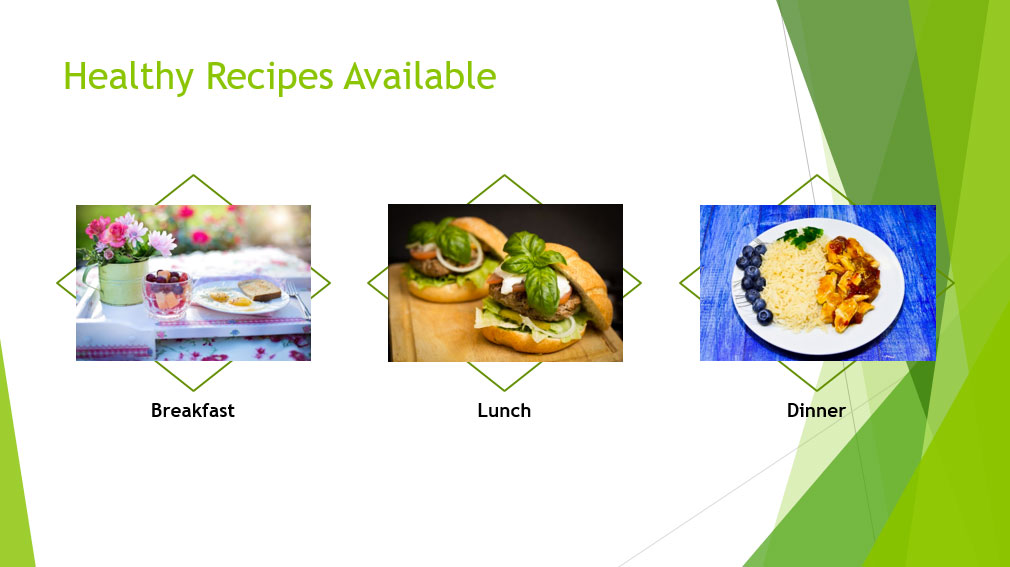
- On the last slide, select the picture of the hamburger and Rotate Left 90°.
- Hold down the Shift key and select all three food pictures. Make sure you do not select the green diamonds.
- Check Align to Slide under the Align command, then Align to Middle.
- With the pictures still selected, Distribute Horizontally.
- Select the first green diamond and send it behind the breakfast picture.
- When you're finished, your slide should look like this:
- E-mail me your final document, titled PPoint Challenge #13.
|
| ||
PowerPoint Challenge #14
- Open our practice presentation. If you already downloaded our presentation in order to follow along with the lesson, be sure to download a fresh copy.
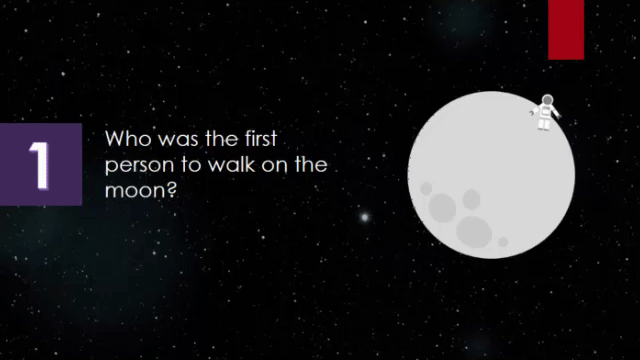
- On slide 2, select the text box that contains Answer: Neil Armstrong, and add a Pulse animation from the Emphasis group.
- In the same text box, add a Wipe animation from Entrance group.
- Change the Effect Options so it wipes From Left.
- Reorder the animations so the Wipe animation will happen first.
- Change the Start options for the Pulse animation so it starts After Previous.
- Use the Animation Painter to copy your animations to the Answer: Mercury text box on slide 3.
- Remove the animations from the text box on slide 3 containing What planet is closest to the sun?
- When you're finished, play your presentation. Slides 2 and 3 should look something like this:
- E-mail me your final document, titled PPoint Challenge #14.
|
| ||
PowerPoint Challenge #15
- Open our practice presentation. Also, right-click this link to our example video and save it to your computer. If you have already downloaded our practice presentation to follow along with the lesson, be sure to download a fresh copy.
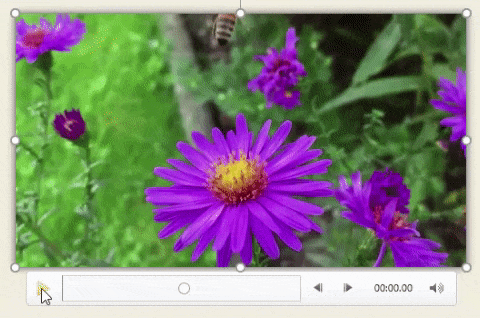
- On slide 2, Insert our example video file.
- Resize the video so it fits next to the text box.
- Apply a video style of your choice.
- Trim the video so the start time is around 00:17.5 and the end time is around 00:25.
- Add a bookmark somewhere in the middle of your video.
- When you're finished, preview your video. It should look something like this:
- E-mail me your final document, titled PPoint Challenge #15.
|
| ||
PowerPoint Challenge #16
- Open our practice presentation. Also, right-click this link to our example file and save it to your computer. Music credit: Something Small (Instrumental) by Minden, C.C. BY-NC 3.0.
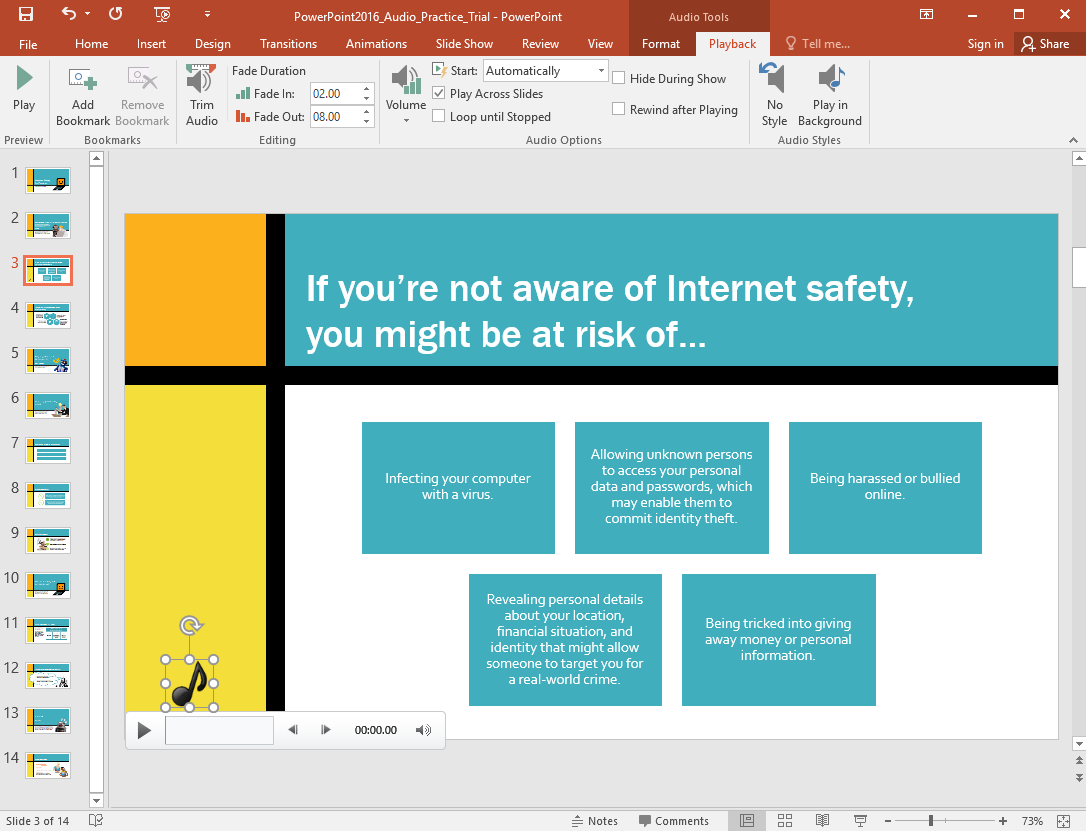
- On slide 3, insert our example audio file.
- Move the file to the bottom-left corner of the slide.
- Trim the audio so the start time is around 00:15 and the end time is around 00:55.
- Change the Fade Duration to 02:00 for fade in and 08:00 for fade out.
- Set the audio to Start Automatically and Play Across Slides.
- Change the icon to an online picture of your choice.
- When you're finished, your slide should look something like this:
- E-mail me your final document, titled PPoint Challenge #16.
|
| ||||
Optional: Play your slideshow from the beginning to test the audio. Your audio should start playing when you get to slide 3, and it should continue to play when you advance to the next slide.
PowerPoint Challenge #17
- Open our practice presentation.
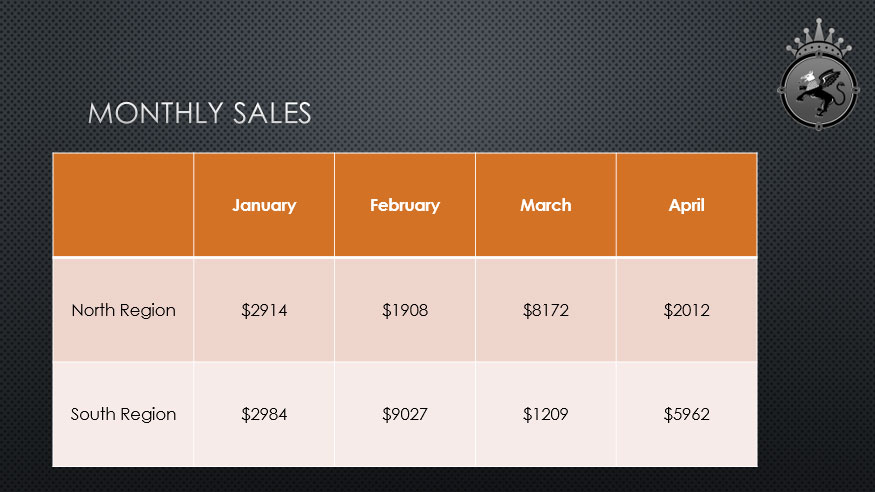
- On the last slide, insert a table with 5 columns and 3 rows.
- In the first row, type the name of the months January through May. In the second and third rows, type sale amounts of your choice (for example, $1329).
- Change the style of the table.
- Insert a column on the left side of the table.
- On the second row of the new column, type North Region. On the third row, type South Region.
- Delete the last column.
- Resize your table so it takes up the majority of the slide.
- Center your text horizontally and vertically.
- When you're finished, your slide should look something like this (table style and colors may vary):
- E-mail me your final document, titled PPoint Challenge #17.
|
| ||
PowerPoint Challenge #18
- Open our practice presentation. You will also need to download our practice workbook.
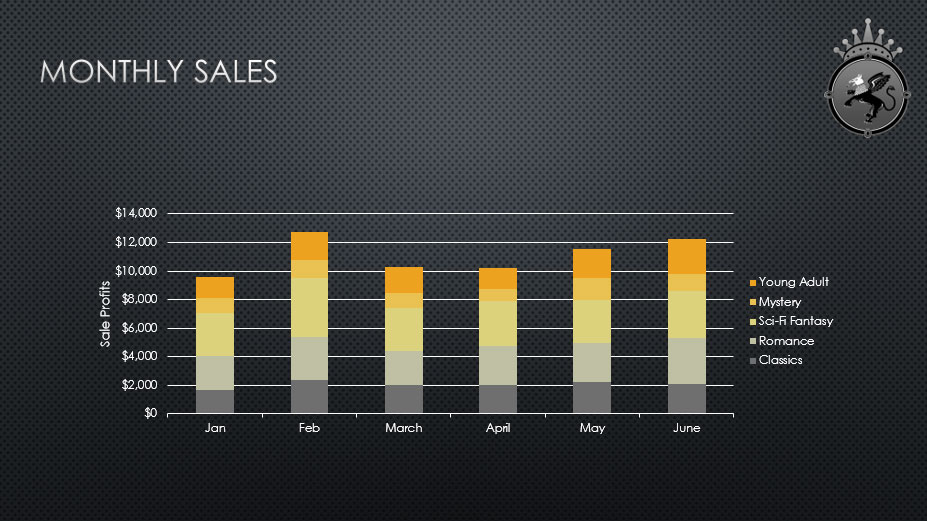
- On the last slide, insert a line chart.
- Open our practice workbook in Excel. Copy the data and paste it into the chart's spreadsheet.
- Delete the chart title.
- Change the chart type to Stacked Column.
- Use the Quick Layout drop-down menu to change to Layout 10.
- Click the Chart Elements shortcut button, click the arrow next to Axis Titles, and select the Primary Vertical axis title.
- Double-click the axis title, then rename it Sale Profits.
- Switch the Row/Column data.
- When you're finished, your slide should look something like this:
- E-mail me your final document, titled PPoint Challenge #18.
|
| ||||
PowerPoint Challenge #19
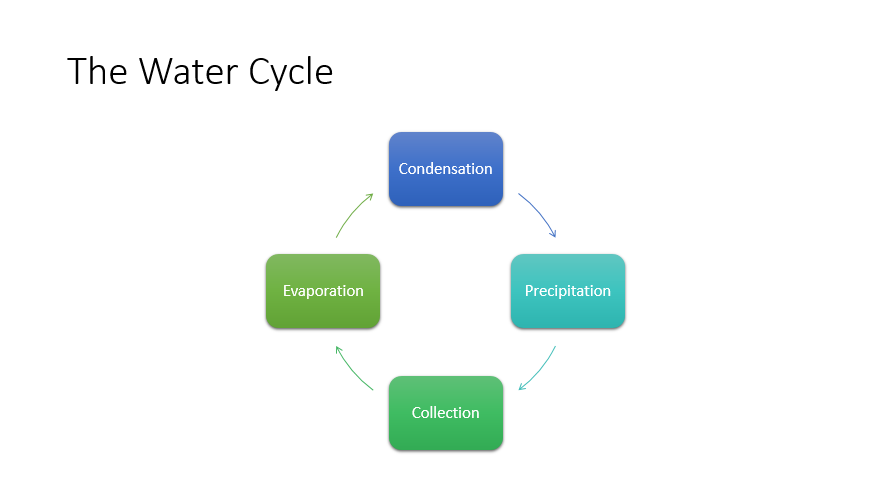
- Open a blank presentation and insert a new slide with a Title and Contentlayout.
- In the Title placeholder, type The Water Cycle.
- In the Content placeholder, choose the SmartArt command and insert a Basic Cycle SmartArt graphic from the Cycle category.
- Insert the following text in clockwise order: Condensation, Evaporation,Infiltration, Precipitation, Collection.
- Delete the shape containing the word Infiltration.
- Select the shape containing Evaporation, and click the Move Downcommand twice to move the shape between Collection and Condensation.
- Change the SmartArt Layout to Block Cycle.
- Change the colors of the SmartArt to a range of your choice.
- Change the SmartArt Style to Intense Effect. The style names will appear when you hover over them.
- When you're finished, your slide should look something like this:
- E-mail me your final document, titled PPoint Challenge #19.
PowerPoint Challenge #20
- Open our practice presentation. If you already downloaded our practice presentation in order to follow along with the lesson, be sure to download a fresh copy.
- Run a Spelling and Grammar check.
- Ignore the spelling of candygrams on slide 7 and the name of the bakery on the last slide.
- Correct all other spelling and grammar mistakes.
- E-mail me your final document, titled PPoint Challenge #20.
| 20powerpoint2016_spellinggrammar_practice.pptx |
PowerPoint Challenge #21
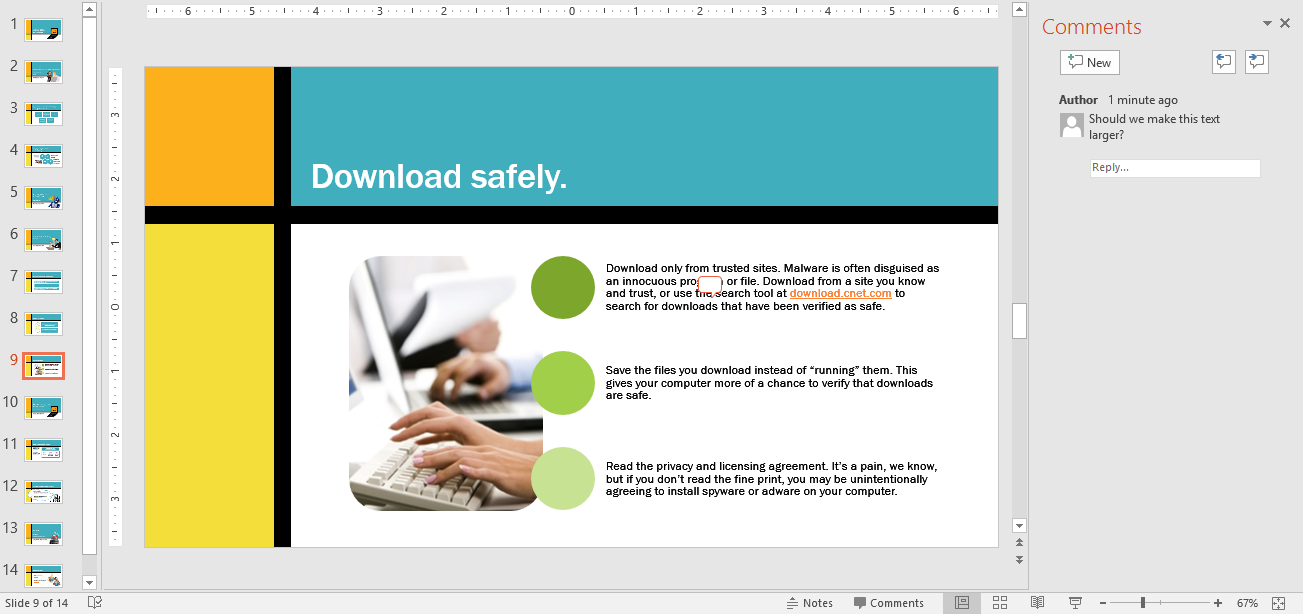
- Download our original practice presentation (powerpoint2016_reviewing_practice) and a slightly altered version(internet safety - tim's edits). If you already downloaded our practice files, be sure to download fresh copies.
- Open powerpoint2016_reviewing_practice. On slide 9, add a commentsomewhere on the slide that says Should we make this text larger?
- When you're finished, slide 9 should look something like this:
4. On the last slide, delete the comment.
5. When you're finished, the last slide should look something like this:
5. When you're finished, the last slide should look something like this:
6. Use the Compare command to compare the original to the slightly altered version (internet safety - tim's edits).
7. Choose the Accept command and Accept All Changes to the Presentation.
8. E-mail me your final document, titled PPoint Challenge #21.
7. Choose the Accept command and Accept All Changes to the Presentation.
8. E-mail me your final document, titled PPoint Challenge #21.
| 21apowerpoint2016_reviewing_practice.pptx |
| 21binternet_safety_-_tims_edits.pptx |
PowerPoint Challenge #22
- Open our practice presentation. If you opened our practice presentation in order to follow along with the lesson, be sure to download a fresh copy.
- Use Document Inspector to check and remove any hidden information.
- Protect the document by marking it as final.
- When you're finished, the top of your presentation should look something like this:
- E-mail me your final document, titled PPoint Challenge #22.
|

| ||
PowerPoint Challenge #23
- Open our practice presentation.
- Change the theme colors.
- Use the Customize Fonts command to change the theme's heading font to Garamond and the body font to Arial.
- Change the theme's background style.
- Optional: Save your customized theme.
- When you're finished, your first slide should look something like this (your colors and background style may vary):
- E-mail me your final document, titled PPoint Challenge #23.
|
| ||
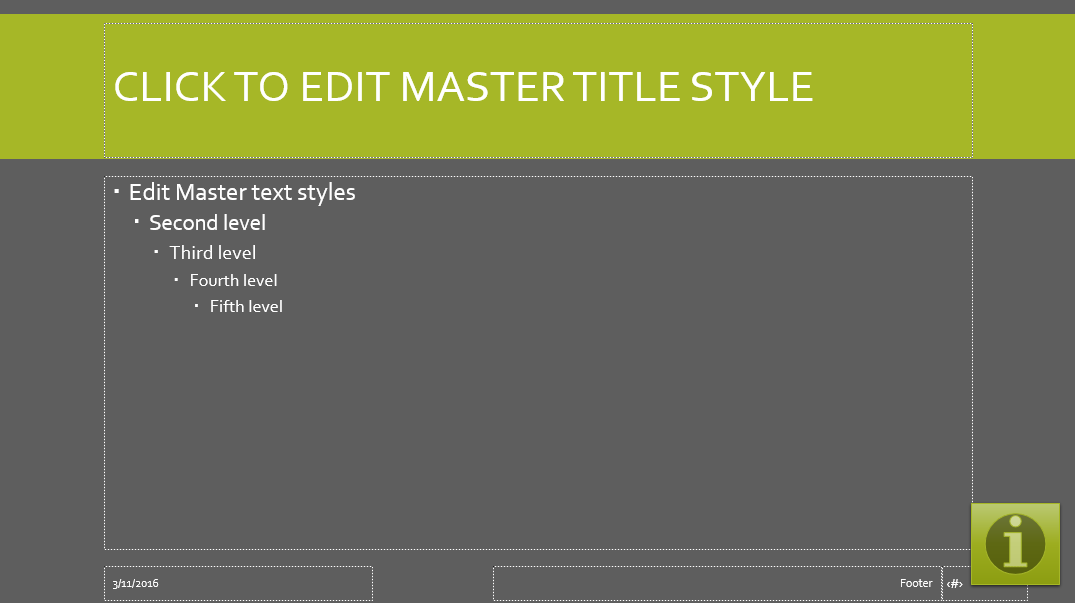
PowerPoint Challenge #24
- Open our practice presentation. If you already downloaded our presentation to follow along with the lesson, be sure to download a fresh copy.
- On the slide master, change the Background Style to Style 7.
- Delete the tall rectangle shape near the left of the slide master.
- Close Slide Master view and select slide 4. Your slide should look like this:
5. Reopen Slide Master view. In the Picture with Caption layout, select the background shape on the left side of the slide behind the text,and change the color to Dark Aqua.
6. When you're finished, slide 2 should look like this:
7. E-mail me your final document, titled PPoint Challenge #24.
6. When you're finished, slide 2 should look like this:
7. E-mail me your final document, titled PPoint Challenge #24.

| 24powerpoint2016_slidemaster_practice.pptx |
PowerPoint Challenge #25
- Open our practice presentation.
- On slide 2, select the Accomplishments shape and create a link to slide 5.
- On slide 11, select the text Tax forms and create a hyperlink to http://irs.gov.
- On slide 12, remove the hyperlink from the text USA.gov Retirement Resources.
- When you're finished, test the hyperlinks you created.
- E-mail me your final document, titled PPoint Challenge #25.
| 25powerpoint2016_hyperlinks_practice.pptx |
PowerPoint Challenge #26
- Open our practice presentation.
- Open Slide Master view. In the left navigation pane, scroll up and select the first slide.
- In the bottom-right corner of the slide, insert the Action Button: Information.
- Link the action button to the last slide.
- Change the shape style of your action button to one of the green styles.
- When you're finished, your slide master should look like this:
- E-mail me your final document, titled PPoint Challenge #26.
|
| ||
8. Close Master View, play your slide show, and test your action button.