Design - 2 Hour Block
Please click on the the words Graphic Design Syllabus to download the syllabus for this class.
|
|

|
|
Value of ACA Certification :
Edelman Intelligence recently conducted in-depth research on the impact ACA certification can have on the success of an aspiring creative professional. View the report below.
Edelman Intelligence recently conducted in-depth research on the impact ACA certification can have on the success of an aspiring creative professional. View the report below.
|
| ||||
Second Semester

Closure Assignment Week 4: 5-15-20 -- 5-22-20

|

|
|
1. First, read the "MTV LOGO Story" article. See the link to the right. (Let me know if you have any issues seeing this article.)
2. Second, in a Word document or in an email, answer the following question below: A. Who designed the MTV logo? B. Describe the process the designers went through in order to complete the MTV Logo. C. What does the author mean when he uses the word "suits" in paragraph 6? D. Why did they choose to not assign corporate colors to the logo? E. Find a version of the MTV Logo you like and share it with me. Describe, why you like it? |
Closure Assignment Week 3: 5-8-20 -- 5-15-20
|
Create a Word document or an e-mail and send me the following assignment:
1. First - download and watch the video below and take notes. 2. List and describe each of the 10 design trends for 2020. 3. In addition, tell me about two things you found cool from the video. Not one of the 10 trends. |
|
Closure Assignment Week 2: 5-1-20 -- 5-8-20
|
Create a Word document or an e-mail and send me the following assignment:
1. First - download and watch the video below and take notes. 2. List 10 things you learned about Graphic Design in film from the video. 3. Next, using the link below list and describe the 8 things Graphic Designers need to know for film. 4. Finally, tell me who Annie Atkins is. Describe to me her career, her experience, her work, ect..... 5. This is due by next Friday, 5-8-20. |

|
Closure Assignment Week 1: 4-20-20 -- 4-24-20
First things first, I miss seeing you! Hope you are all doing well. As we continue your learning from home, Your first assignment is to follow the directions below to have access to Adobe Creative Cloud from home. As we adjust to the new norm, our focus will be on getting you back into a new routine, and getting back into Adobe. With the goal of getting your certification from Adobe in the application of your choice. Email me once you have successfully downloaded Photoshop, Illustrator, Indesign, and if you have any issues.
As a result of campus closure, student access to Adobe Creative Cloud in labs and classrooms is not available. Adobe has provided temporary at-home access for impacted students and educators, so that they can continue their work remotely. Please follow the instructions below to enable access to Creative Cloud Desktop Apps on your personal device.
As a result of campus closure, student access to Adobe Creative Cloud in labs and classrooms is not available. Adobe has provided temporary at-home access for impacted students and educators, so that they can continue their work remotely. Please follow the instructions below to enable access to Creative Cloud Desktop Apps on your personal device.
- Visit https://creativecloud.adobe.com and use your school credentials to sign in. Must be your Buchanan email credentials.
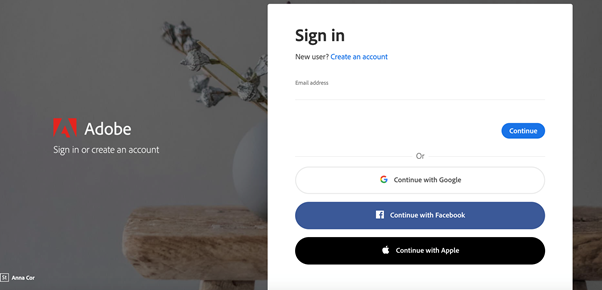
2. If prompted, select Company or School Account and then enter your password. Or provide your credentials in your school’s login screen.

3. From the Creative Cloud website, browse for and download your desired app. Click Apps on the top of the page to view all apps.
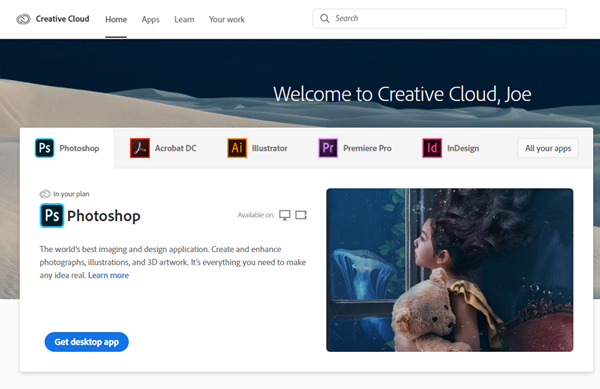
For more information on how to download or install apps, see Download and Install Creative Cloud apps.
Your Second assignment is to get signed up for GMetrix. I have been working hard to figure out a way to get you all your certification in Adobe CC, and I think I've found a solution. We will be using a program called GMetrix, that allows you to take a bunch of practice tests online in order to get ready for the test. I know it will not be the same as our time in class, but I'm hoping this will be enough to get you all the certification that you've worked so hard to earn this year. Please follow the instructions below to create an account. Please be sure that you have logged into GMetrix and downloaded the Adobe CC program onto your computer by this Friday, April 24th so that you are ready to go for your first assignments. I know this looks like a lot, but we can do this!
You will need the following access code: 29143-RPdesign-25289
1. In a web browser, navigate to the GMetrix Online Student Portal at www.gmetrix.net.
2. Click the Sign Up Now link below the login field and fill out the Student Registration Form.
3. Once registered, return to the Student Portal login page and sign in to the Portal.
4. Use the Light Blue Key from Navigation Bar on the left to Redeem your Access Code.
5. Type or paste your Access Code into the field and click Redeem Code.
Note that once you redeem your Access Code it becomes bound to your account and does not need to be redeemed again in the future.
Once you have redeemed an Access Code you can start taking practice exams. GMetrix Web-Based practice exams generally a combination of multiple-choice, drag/match, fill-in-the-blank, and/or simulation questions. While most tests will function properly in any major browser, it is generally recommended that you use Google Chrome if possible. To start a new practice exam, follow the steps below.
1. Log on to your account at www.gmetrix.net.
2. Click the Start a New Test tile.
3. Select a Catagory, then select the product you would like to test. (you will want Photoshop or Illustrator)
4. The Practice Tests available for that product will show up. Hover over the test you want to take and select Training or Testing mode. The test will then begin.
5. Once you have answered all of the questions, click the Finish button on the Summary page to submit your test. Keep in mind that you can Save your test at any time by clicking the icon at the top of the page. Saving your test will allow you to resume it later but does not submit your test for grading.
Week 26: 3/9 - 3/13
|
Wednesday - March 11th:
Our next activity in Adobe InDesign is two-fold. First: 1. In the video below you will learn 5 gems in InDesign and a few bonus features. These will help you with future InDesign projects. 2. Open Adobe InDesign CC, watch the video, follow along and practice the 5 gems Terry discusses. 3. Create a word document. List and describe the 5 gems and any bonus features learned in the video. Print and turn in. Second: 1. This next project you will be creating a calendar from scratch. 2. Watch the video to the right and follow along. 3. Your design, your images, your calendar can be about anything you want. Your family, your passion, your artwork, anything. 4. You will need to include all federal holidays, and any other meaningful days you want to include in your calendar. (birthdays, silly days, ect..) 5. Print and staple, make it look like a calendar the best you can & e-mail me your InDesign file. |
|

Week 24: 2/24 - 2/28
Friday - February 29th: Today we start the Doodle 4 Google contest. See the information and details below!

See the link to the contest below. We will review this in class, but you are responsible to review the contest requirements. We will be submitting them online.
This year’s Doodle 4 Google theme is:
“I SHOW KINDNESS BY...”
Friendship, smiles, thank yous, and hugs.
But kindness is so much more than just being nice. This year’s theme invites you to tell us how you show kindness. Is it by helping around your home? Volunteering in your community’s green space? Maybe it’s comforting someone who’s down, or picking up trash in the park.
However you define it, let us know how you bring a little bit more kindness into the world. Take your ideas and bring them to life in your doodle!
This is the Doodle 4 Google 2019 - US Winner

Some more examples are below. Remember being a "Google Doodler" is a real career! How fun would that be?


Week 23: 2/17 - 2/21
Thursday - February 20th:
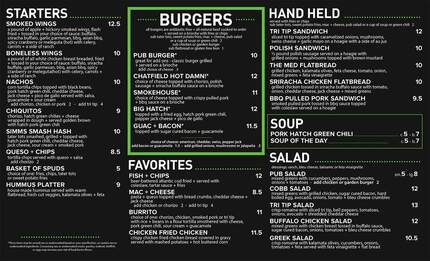
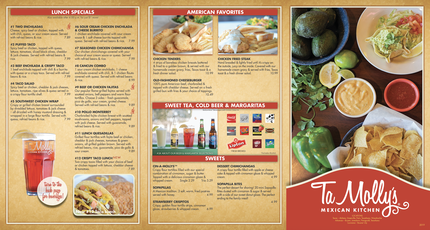
Today we begin our first InDesign Project. You will be creating your very own Menu!
1. See the document below for project instructions and the rubric.
2. You might want to research some menu's to get an idea. See some examples below.
3. Be creative, have fun, but make it look professional. You can use Illustrator & Photoshop in this project, but the Menu must be created in InDesign, and must all be original work.
4. When complete, print final menu in color and turn in.
5. E-mail me your final InDesign file.
6. Don’t forget about the peer review, and the feedback document at the end.
| indesign_menu_project.doc |
|
|
Week 22: 2/10 - 2/14
Friday - February 14th:
Today we continue the textbook working with Adobe InDesign CC.
For today: This is our last InDesign Chapter! :)
1. Pick up where you left off from yesterday before moving on.
2. Read and follow along in chapter 9, Working with Tab and Tables. (we are skipping chapter 8)
3. Complete Skills Review. (9-38)
3. Complete Project Builder 1. (9-40).
3. Complete Project Builder 2. (9-41).
4. Complete Design Project. (9-42)
6. Complete the Portfolio Project. (9-43)
7. Save and E-mail me your final assignment files. Be sure to include your name & assignment in subject line.
Thursday - February 13th:
Today we continue the textbook working with Adobe InDesign CC.
For today:
1. Pick up where you left off from yesterday before moving on.
2. Read and follow along in chapter 7, Creating Graphics.
3. Complete Skills Review. (7-34)
3. Complete Project Builder 1. (7-36).
3. Complete Project Builder 2. (7-37
4. Complete Design Project. (7-38)
6. Complete the Portfolio Project. (7-39)
7. Save and E-mail me your final assignment files. Be sure to include your name & assignment in subject line.
Wednesday - February 12th:
Today we continue the textbook working with Adobe InDesign CC.
For today:
1. Pick up where you left off from yesterday before moving on.
2. Read and follow along in chapter 5, Working With Color.
3. Complete Skills Review. (5-38).
4. Complete Project Builder 2. (5-41)
5. Complete the Design Project. (5-42)
6. Complete the Portfolio Project. (5-43)
7. Read and follow along in chapter 6, Working With Placed Images.
8. Complete Project Builder 1. (6-49).
9. Complete Design Project. (6-51)
10. Complete the Portfolio Project. (6-52)
11. Save and E-mail me your final assignment files. Be sure to include your name & assignment in subject line.
Monday - February 10th:
Today we continue the textbook working with Adobe InDesign CC.
For today:
1. Pick up where you left off from Friday before moving on.
2. Read and follow along in chapter 3, Setting Up A Document.
3. Complete Project Builder 1. (3-60).
4. Complete Project Builder 2. (3-61)
5. Complete the Design Project. (3-62)
6. Complete the Portfolio Project. (3-63)
7. Read and follow along in chapter 4, Working With Frames.
8. Complete Project Builder 1. (4-60)
9. Complete Project Builder 2. (4/61)
10.Complete Design Project. (4-62)
11. Complete Portfolio Project. (4-63)
12. Save and E-mail me your final assignment files. Be sure to include your name & assignment in subject line.
Week 21: 2/3 - 2/7
Finish your Andy Warhol / Pop Art assignment from yesterday before moving on.
Thursday - February 6th:
Today we get back into the textbooks and start Adobe InDesign CC. You might need to reference your 10 Things document you completed at the start of the year. Or even review the video below.
For today:
1. Read and follow along in chapter 1, Getting to know InDesign.
2. Complete Project Builder 2 (1-43).
3. Complete the Design Project. (1-44)
4. Complete the Portfolio Project. (1-45)
5. Read and follow along in chapter 2, Working with Text.
6. Complete Project Builder 1 & 2. (2-42/43)
7. Complete Design Project. (2-44)
8. Portfolio Project. (2-45)
8. Save and E-mail me your final assignment files. Be sure to include your name & assignment in subject line.
Wednesday - January 5th:
Today you will be learning about Pop Art and Andy Warhol. After watching the video as a class complete the following activities:
1. After watching the video, list 15-20 things you did not know about Andy Warhol.
2. List 15-20 things you did not know about Pop Art.
3. Create two pop art images using the tutorial below (or use your own technique of pop art. Pick a famous person and also use yourself or a peer for your creations. You may use either Photoshop or Illustrator for this assignment.
4. Submit the following:
- 2 lists created from video
- 2 pop art images that you create

|

|

|
Pop Art Tutorial >>> |
|
Week 20: 1/27 - 1/31

Friday - January 31st:
Today we will learn about one of my favorite designers, Aaron Draplin. While we watch 3 videos as a class, create a document and answer the questions below: (you will submit the answers to these questions.)
- How would Aaron Draplin describe his work and what he does?
- According to Aaron, how does he think his work has evolved through the years?
- What is his take on current design trends?
- What inspires him and keeps him going?
- How important is collaboration in his work process?
- According to Aaron, what would be his best advice to upcoming designers?
Part 2 – Creating a design brief and doing the research – Now that you have decided on the type of company, its products and services, who is the competition out there that already exists? What do those logos look like and are they effective? Who are your companies customers? What is the age range of your customer? Where will they find your business? Online or offline? Describe why. The more you know about your business, its products and services (and the believe in them) the more you can offer a solution to your client. A logo is usually the first thing that they will see. How will you grab their attention with your companies visual identity? (this is just brainstorming - you do not need to submit anything for this part.)
Part 3 – Sketch and development. We have already watched Draplin’s video about sketching, but the video is included below for your reference. He has a great style and technique for the process. Create a series of sketches in pencil. You will need a minimum of 10 logo sketches. (submit 10 sketches)
Part 4 - Finally, you will create your new companies logo in Illustrator. Choose the logo that best represents your description from part one. (submit the final Illustrator logo).
**We will be using Adobe Illustrator for this project from start to finish.
Below are the videos we watched in class if you need to remind yourself about what we learned today in class.
|
|
|
|
Monday - January 27th
Being creative is easy for some of us and harder for others. So how can you be more creative?
Step 1:
We will watch a short video as a class on how to be more creative before moving on to the document below.
Step 2:
The document gives you 27 tips on how to be more creative in art, business, life, whatever. Open the PDF and read it!
Step 3:
Create a word document and answer the following questions:
1. According to the video, what are the 6 things needed to unlock creativity? The speaker refers to these 6 things as her "innovation engine". Please list.
2. From the article, list and describe 15 of the 27 tips. Rank the 15 items you chose in order of those you find the most important to the least important.
3. In your descriptions of the tips explain why you agree or disagree with that tip.
*Remember, you can put tips on your list that you disagree with as long as you explain why you felt they needed to be included in your list.
4. Based on the video's discussion of habitats, how effective is our habitat here at the High School? How could we make our habitat more conducive to creativity? Think about our classroom and your specific high schools as well.
5. Research and find 2 other articles/web pages/links that discuss ways to be more creative.
6. Give a brief description of the 2 sites you found.
7. Lastly, give a bio on all 3 of the authors from this assignment. Include the article I provided as well as the 2 articles that you found. Learning about the authors of an article will help determine if they are a credible source, so be specific. Each bio should be a minimum of 1-2 paragraphs. (a paragraph should have at least 5 sentences).
Step 4:
Print and turn in your final paper. Be sure to cite your sources.
| 6.howtobecreative.pdf |
First Semester
Week 18: 1/13 - 1/17
Monday - January 13th
Today you will begin your first semester final exam project. See the document below for project details. Read it in it's entirety, multiple times, and make sure you understand all aspects of the project before beginning. This is due Wednesday, January 22nd. So use your time wisely. Have fun, and be creative.
Today you will begin your first semester final exam project. See the document below for project details. Read it in it's entirety, multiple times, and make sure you understand all aspects of the project before beginning. This is due Wednesday, January 22nd. So use your time wisely. Have fun, and be creative.
| wacky_water_slidz_illustrator_and_photoshop_final_exam_project.doc |
What to Turn In: (Print in this order)
1. Project Scoring Guide & Instructions.
2. List of attractions.
3. Logo.
4. Grand Opening Flyer.
5. Park Guide.
6. Ticket.
7. Option 1A or 1B.
8. Option 2A or 2B.
1. Project Scoring Guide & Instructions.
2. List of attractions.
3. Logo.
4. Grand Opening Flyer.
5. Park Guide.
6. Ticket.
7. Option 1A or 1B.
8. Option 2A or 2B.
Week 17: 1/6 - 1/10
Monday - December 6th

This is our last Design Contest of the Semester! Let's finish strong!
The state of Michigan has created a design contest for all students ages K-12.
What: Program Cover design for State of the State Address.
The State of the State Address is a speech customarily given once each year by the governors of each of the states of the United States. The speech is customarily delivered before both houses of the state legislature sitting in joint session. The speech is given to satisfy a constitutional stipulation that a governor must report annually, or in older constitutions described as being "from time to time", on the state or condition of a U.S. state. The potentially unclear name reflects the dual meanings of the word "state"; the first refers to the general condition of a thing, and the second refers to the political conception of a state
Who: All students ages K-12th grade.
Theme: “What Michigan Means to Me.”
When: Must submit design via e-mail no later than January 10th.
Assignment:
1. Research images, based on the theme. (State of the union logo, state flag, symbols of MI, Michigan slogan)
2. Create 10-15 thumbnail sketches for your cover. (you will turn these in with your cover)
3. Write a description of your cover. Tell me how your cover expresses the theme, according to you, in your own words. This should be at least 2 paragraphs.Based on your research & sketches, Create a program cover based on the theme.
What to Turn In:
1. Printed colored copy of your cover.
2. Sketches (10-15).
3. Written description of your cover.
4. Online submission of your cover. You will submit your own information and cover online. Call me over when you are ready to submit your project to the contest site.
Click on this STATE OF THE STATE CONTEST to see the official instructions
The MI Gov link below might be a good place to start as part of your research.
| illustrator_assignment_rubric.docx |
Week 16: 12/16 - 12/20
Monday - December 16th
As we finish up our Famous Artist projects, we will finish the year with a logo contest. Having multiple projects and deadlines are part of the design industry. See the link below for the logo details. The due date is Friday, Dec 20th. That gives you 1 week to finish your current project and complete the Buses By The Beach Logo contest. Review contest details and prior winners and logos to get some ideas. You will e-mail me your final logo when complete. You will also need to submit your own final logo submission using your school email address & CC me on the e-mail. Be sure to follow ALL requirements as listed on their website - this is your responsibility! Also - make sure that you submit everything listed below in order to be eligible for full credit.
Turn in:
1. E-mail me your logo file.
2. Print and turn in a colored copy of your logo.
3. 10-15 thumbnail sketches for your logo.
4. A short description of your logo: What skills did you use? What was your thought process when creating this logo?

2020 Bus Benefit logo contest winner,
by Jennifer Maas
by Jennifer Maas
Week 15: 12/9 - 12/13
Tuesday - December 11th
Choose one of the following: A Famous....
1. Painter or Sculptor
2. Photographer
3. Graphic Designer
4. Architect
5. Animator or Special Effects Artist
You will need to research your artist in order to be able to create a PowerPoint that you will present to the class. Your presentation must include:
1. A biography or profile of the artist, background information, what makes them famous, ect...
2. A detailed description of the art movement they were associated with or style of art they created/create.
3. A detailed description on at least 3 famous works of art/design works/photographs/special effects or animation created by that artist.
4. 20 slides (remember you need to show us samples of your artists work and you should not put more than 1 sample on a slide so that we can see it clearly.)
5. During the presentations you will pay attention and then write a 1 paragraph summary on each of your classmates artists showcasing what you your learned about each artist. These summaries should be written as 1 paper and submitted at the end of the all presentations.
***Mr. Philip must approve each artist. Each student should have a different artist.
Be sure to check the rubric for the breakdown of the grade.
| presentation_rubric.doc |
Week 12: 11/18 - 11/22
Personal Brand Logo Project
Friday - November 22nd: DUE - DECEMBER 4TH.
We are going to embark on our first major project in Illustrator - Creating your own, personal brand logo. This project will involve research, design, and instruction. The entire project is worth 150 points and will NOT be completed in 1 day. You will be graded on the practice activity, content of your research paper, the sketches and creation of your logo, the written step by step guidelines that you create to teach someone else how to duplicate your logo, and the recreation of your logo from your peer that used your guidelines. You will need to be thorough and specific throughout the entire process in order to be successful on this assignment. I want excellence rather than speed on this project so take your time and show me what you can do! Good luck - I know that we are going to see and learn some amazing things through this project!
:) Some things that you should keep in mind as we begin:
1. This logo should represent who you are as a person
2. Looking at the completed logo we should have a better understanding of what is important to you.
3. This must be an original design!
4. The plan is to put these on T-shirts.
Step 1: Practice
1. Watch the video on your own, taking notes as you go. (use headphones)
Have your illustrator open, stop the video as needed.
2. Create the logo that the video teaches you. There are many different steps that you will need to complete in order to recreate the logo from the video.
3. Save as a JPG. Print and submit as part of your project packet.
***I'm including a picture of the final logo that you are creating so that you have some idea of what direction you are heading with this assignment. Some of this is review, but you will learn some valuable techniques in creating a logo.
Step 2: Research
Using MLA Format...YES MLA format
You will complete a minimum 2 page research paper regarding copyright infringement. You will answer a series of questions in paper format. This means real paragraphs. A numbered paper with typed out questions and responses will NOT be accepted. You will need to answer the questions in paragraph format as if writing a research paper. The questions are designed to prompt you regarding the objective of the paper. The following question should get you started, but please don't limit yourself to answering just these questions:
- Define copyright infringement to logo designs
- What is not able to be copyrighted in design?
- What does the circled C do for you and do you need to include it on your logo/work?
- What do you need to prove if you want to sue a copycat?
- Whys is logo ownership important?
- Who owns logo design? The client or the designer?
|
Step 3: Brainstorming
You will sketch ideas for your logo - this should be a hand sketched project, no technology should be used. It may be in pencil, pen or color, but it must be your original sketch. We are going to be using the thumbnail strategy discussed in the video to the right. 16 thumnail sketeches will be required and you will need to follow the 5 steps discussed in the video when creating your thumbnail sketches. |
|
Step 4: Creation, Explaination & Recreation
You will design your logo in Illustrator. You will be required to keep a step by step documented record of your logo process. At the end of the project you will give your step by step instructions to a peer and they will have to recreate your logo using only your written instructions. Visual aids will not be allowed. You will submit the logo that your peer created following your step-by-step instructions with the rest of your assignment.
You will design your logo in Illustrator. You will be required to keep a step by step documented record of your logo process. At the end of the project you will give your step by step instructions to a peer and they will have to recreate your logo using only your written instructions. Visual aids will not be allowed. You will submit the logo that your peer created following your step-by-step instructions with the rest of your assignment.
Grading Expectations for Personal Logo Project:
Your project packet must be stapled together and include ALL of the following items:
1. Practice Logo (follow instructions in the video)
2. Research Paper (see general essay rubric below)
3. 16 Sketches (follow the 5 steps discussed in the video)
4. Your personal logo (see illustrator assignment rubric below). You must also email me your logo. Just the logo.
5. Detailed instructions on how to recreate your logo. (be specific)
6. Peer recreation of your logo using your instructions. (the more detailed the instructions the better this will be)
|
| ||||
Week 11: 11/11 - 11/15

Monday - November 11th
Today we start our first Design Contest in the class! Make sure your book work is done first, and let the creative juices flow!
We did this awesome contest the last couple years and it’s that time of year again! Plus you could win some cash! Last year one of our students took the 2nd place junior award and won $250! You could be next!
About the North American International Auto Show (NAIAS) Poster Contest:
The 32nd annual North American International Auto Show (NAIAS) Poster Contest was open to Michigan students in grades 9 through 12. High school students are invited to submit 18” x 24” posters and have a chance to become involved in our world premier auto show in Detroit, while gaining experience in creative competition. The poster entries are judged by an independent panel of recognized members of the local art community. All winning entries will be on display during the public show at; and will also be included in the official NAIAS program. Plus $6800 in scholarship money will be awarded to 16 students.
Deadline is November 22, 2019.
Guidelines - Poster MUST contain:
Reference the links below to see the details on this contest. YOU ARE RESPONSIBLE TO REVIEW THE CONTEST DETAILS, SO YOU DON'T GET DISQUALIFIED!
Due to the time it takes to get the posters created and mailed out before the deadline. The classroom due date for this contest will be earlier than the contest deadline. I would highly recommend reviewing prior winners to get ideas.
Today we start our first Design Contest in the class! Make sure your book work is done first, and let the creative juices flow!
We did this awesome contest the last couple years and it’s that time of year again! Plus you could win some cash! Last year one of our students took the 2nd place junior award and won $250! You could be next!
About the North American International Auto Show (NAIAS) Poster Contest:
The 32nd annual North American International Auto Show (NAIAS) Poster Contest was open to Michigan students in grades 9 through 12. High school students are invited to submit 18” x 24” posters and have a chance to become involved in our world premier auto show in Detroit, while gaining experience in creative competition. The poster entries are judged by an independent panel of recognized members of the local art community. All winning entries will be on display during the public show at; and will also be included in the official NAIAS program. Plus $6800 in scholarship money will be awarded to 16 students.
Deadline is November 22, 2019.
Guidelines - Poster MUST contain:
- "2020 North American International Auto Show" or "2020 NAIAS"
- "Detroit"
- Have an automotive or Detroit theme
Reference the links below to see the details on this contest. YOU ARE RESPONSIBLE TO REVIEW THE CONTEST DETAILS, SO YOU DON'T GET DISQUALIFIED!
Due to the time it takes to get the posters created and mailed out before the deadline. The classroom due date for this contest will be earlier than the contest deadline. I would highly recommend reviewing prior winners to get ideas.
Week 8: 10/21 - 10/25
Friday - October 25th: Illustrator Tutorial Presentation Project
1. Find a tutorial for Illustrator that you can do from start to finish. (remember to choose Illustrator Adobe CC 2018)
* Challenge yourself and try something new!
* This tutorial should teach us all something new.
* Remember to watch the entire tutorial to make sure it is something you can actually MASTER and TEACH!
* Once you have selected a tutorial you need to run it by me for approval BEFORE you begin working on it.
Remember:
1. FOLLOW THE RUBRIC....after you've read the rubric then proceed to step #2.
2. Try to be realistic...your tutorial shouldn't take 6 weeks to master. Find something challenging, but manageable.
2. Complete the project and MASTER the skill. You must be able to show the class how to do the skill and answer questions about it as well.
3. Teach the class how to do your chosen project without using the original tutorial.
* You will get in front of class and use the teacher computer and projectors to show your skill to the class.
* You will take the class from start to finish and answer their questions as you go thru.
* When choosing your lesson, remember that your classmates need to be able to complete it in 1 single class.
* You must have a handout for your peers and Mr. Philip as a guideline for your skill.
You will be graded on:
1. The original product that you complete using the tutorial (using the Illustrator assignment rubric)
2. The lesson you give in class (remember this needs to be able to be completed in 1 class session)
3. The handout you create for your classmates.
4. The difficulty of the skill. If you choose to show us how to create a line you will struggle on this project.
Challenge yourself and your classmates and remember REVIEW THE RUBRIC!
Remember to verify that the tutorial you choose is Adobe CC.
******We will start these tutorials Tuesday, October 29th, so use your time wisely*******
|
| ||||
Student Files
|
Alexandria Dragon Image
|
Belle Bird Image
|
|
| ||
Olondra's Images

|
|

Tuesday - October 22nd:
Today continue in the Illustrator textbooks and work through chapter 5. Finish Chapter 4 first before moving on. This is the final chapter for Illustrator!
1. Read and follow along in chapter 5. Working With Layers
2. Complete the Skills Review. (5-30).
3. Complete Project Builder 1 & 2 (5-32/533).
4. Design Project (5-34) & Portfolio Project. (5-35).
5. Save and E-mail me your final assignment files, and be sure to include your name & assignment in subject line.
Week 7: 10/14 - 10/18
Friday - October 18th
Today we continue in the Illustrator textbooks. Finish chapter 3 assignments before moving on.
1. Read and follow along in chapter 4. Transforming and Distorting objects.
2. Complete the Skills Review, all parts.
3. Complete Project Builder 1 & 2 (4-58/59).
4. Complete the Design Project. (4-60)
5. Complete the Portfolio Project. (4-61)
6. Save and E-mail me your final assignment files, and be sure to include your name & assignment in subject line.
Tuesday - October 15th
Today we continue in the Illustrator textbooks. Finish chapter 2 assignments before moving on.
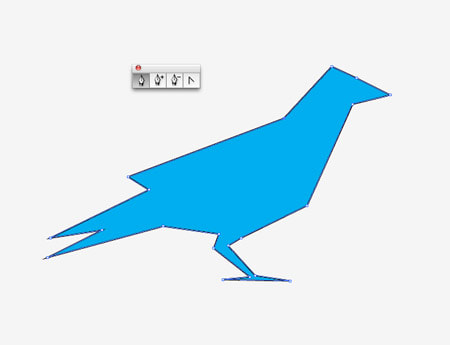
1. Read and follow along in chapter 3. Drawing & Composing an Illustration.
2. Complete the Assembled Snowball illustration activity from the chapter.
3. Complete the Skills Review. (only the Mighty Montag)
3. Complete Project Builder 1 & 2 (3-70-71).
4. Complete the Design Project. (3-72)
5. Save and E-mail me your final assignment files, and be sure to include your name & assignment in subject line.
Today we continue in the Illustrator textbooks. Finish chapter 2 assignments before moving on.
1. Read and follow along in chapter 3. Drawing & Composing an Illustration.
2. Complete the Assembled Snowball illustration activity from the chapter.
3. Complete the Skills Review. (only the Mighty Montag)
3. Complete Project Builder 1 & 2 (3-70-71).
4. Complete the Design Project. (3-72)
5. Save and E-mail me your final assignment files, and be sure to include your name & assignment in subject line.
Week 6: 10/7 - 10/11
Wednesday - October 9th:
Today continue in the Illustrator textbooks and work through chapter 2. Finish Chapter 1 first before moving on.
1. Read and follow along in chapter 2. Creating Text and Gradients
2. Complete the Skills Review. (2-42)
3. Complete Project Builder 1 & 2 (2-44/45).
4. Complete the Design Project. (2-46)
5. Complete the Portfolio Project. (2-47)
6. Save and E-mail me your final assignment files, including your Skills Review. Be sure to include your name & assignment in subject line.
Tuesday - October 8th:
Today we start in the Illustrator textbooks and work through chapter 1.
1. Read and follow along in chapter 1. Getting to Know Illustrator
2. Complete the Skills Review, all Parts. (1-80)
3. Complete Project Builder 1 & 2 (1-88).
4. Complete the Design Project. (1-90)
5. Complete the Portfolio Project. (1-91)
6. Save and E-mail me your final assignment files, including all parts of your Skills Review. Be sure to include your name & assignment in subject line.
Week 5: 9/30 - 10/4
Thursday - October 3rd: All right, I'll toss a bone to you humor-oriented folk. In this Photoshop assignment you're going to take any image from a movie (or advertisement for it) and make a parody out of it (i.e. Lady and the Trampoline, Willie Wonka and the Lye Factory, or Fatman Begins).
The rules of this assignment are thus:
The rules of this assignment are thus:
- Take any image from a movie (or an ad or box cover) and make a parody out of it. The sillier the better!
- Please download the rubric documents below for the instructions for our Movie Parody assignment. See some examples below.
- You are required to submit two movie parody posters.
- Remember...These should look like real movie posters. You need the fine print details and each of your posters should be unique. (including the fine print information)
| photoshop_assignment_rubric.docx |

|

|

|
Tuesday - October 1st:
Today we stay in the textbooks and work on chapters 6.
1. Read and follow along in chapter 6. Placing Type in an Image.
2. Complete Skills Review. (6-31)
3. Complete Project Builder 1. (6-32)
4. Complete Project Builder 2. (6-33)
5. Complete Design Project. (6-34)
6. Complete Portfolio Project. (6-35)
7. Save and E-mail me your final assignment files. Be sure to include your name & assignment in subject line.
8. The data files can be found below on the "O" drive.
Week 4: 9/23 - 9/27
Friday - September 27th:
Today we stay in the textbooks and work on chapters 4 & 5.
1. Read and follow along in chapter 4. Making Selections
2. Complete the chapter activity, and e-mail me your final Table Vignette.
3. Complete Skills Review. (4-27)
4. Complete Project Builder 1. (4-28)
5. Complete Project Builder 2. (4-29)
6. Read and follow along in chapter 5. Incorporating Color Techniques.
7. Complete Project Builder 1. (5-37)
5. Complete Project Builder 2. (5-38)
9. Complete Design Project. (5-39)
11. Complete Portfolio Project. (5-40)
12. Save and E-mail me your final assignment files. Be sure to include your name & assignment in subject line.
13. The data files can be found below on the "O" drive.
Tuesday - September 25th:
Today we start with the textbooks and work on chapter 2 & 3.
1. Read and follow along in chapter 2. Learning Photoshop Basics.
2. Complete the Skills Review (2-31).
3. Complete the Project Builder 2. (2-33
4. Complete the Portfolio Project. (2-35)
5. Read and follow along in chapter 3. Working With Layers.
6. Complete the Skills Review. ( 3-25)
7. Complete Project Builder 1. (3-27)
8. Complete Project Builder 2. (3-28)
9. Complete Design Project. (3-29)
10. Complete Portfolio Project. (3-30)
11. Save and E-mail me your final assignment files. Be sure to include your name & assignment in subject line.
12. The data files can be found below on the "O" drive.
Week 3: 9/16 - 9/20
Monday - 9/16:
1. Find a tutorial for Photoshop that you can do from start to finish. (remember to choose Adobe CC 2018)
* Challenge yourself.
* This tutorial should teach us all something new.
* Remember to watch the entire tutorial to make sure it is something you can actually MASTER and TEACH!
* I must approve your tutorial, so see me when you think you have selected a skill to teach. Please follow these guidelines below.
A. FOLLOW THE RUBRIC....after you've read the rubric then proceed to step #2.
B. Try to be realistic...your tutorial shouldn't take 6 weeks to master. Find something challenging, but manageable. Face Swap is always a popular one. First come first serve.
C. Ask your classmates or see me to see if any of them have chosen the same tutorial. You may not do the same thing to teach to each other.
2. Complete the project and MASTER the skill. You must be able to show the class how to do the skill and answer questions about it as well.
3. Teach the class how to do your chosen project without using the original tutorial.
* You will get in front of class and use the teacher computer and projectors to show your skill to the class.
* You will take the class from start to finish and answer their questions as you go.
* When choosing your lesson, remember that your classmates need to be able to complete it in 1 single class. (2 hours)
* You must have a handout for your peers and Mr. Philip as a guideline for your skill.
You will be graded on:
1. The original product that you complete using the tutorial (using the Photoshop assignment rubric)
2. The lesson you give in class (remember this needs to be able to be completed in 1 class session)
3. The handout you create for your classmates.
4. The difficulty of the skill. If you choose to show us how to create a line you will struggle on this project.
Challenge yourself and your classmates and remember REVIEW THE RUBRIC!
I am attaching some links as resources for Photoshop tutorials, but remember to verify that the tutorial you choose is Adobe CC 2018. You may find your own resource, but these links will at least give you a place to start. Click on the buttons below to be directed to the links.
| |||||
Files needed for student tutorials:
|
Jazmin file.
|
Ethan file:
|

|

|
|
Angelina file:
|
Alex file:
|

|

|
Layla File:

|

|
|
Belle File:
|
Alondra Files:
|

|

|

|
Week 2: 9/9 - 9/13
Friday - 9/13:
Today we will watch a video around the history of Photoshop.
Your assignment is to open a Word doc and answer the questions below.
1. List 20 things you did not know about Adobe / Photoshop / or Pixels.
2. Who are the guests being interviewed?
3. How did each of them affect the making of Photoshop?
4. When done, print and turn in. With the rest of the time get caught up, then its your creative time! Be creative! Have fun!
Wednesday - 9/12:
1. Finish the Photoshop CC, Illustrator CC, InDesign video AND the assignment papers.
2. If you have completed the prior videos and your papers, then proceed to the Animate CC video and complete the following activities:
3. Create a new Google Doc titled 10 things about Animate CC.
4. Begin watching the video and FOLLOW ALONG. You will open Animate CC and find 10 skills that you can use from this video. You want to attempt some of the things from this video, so you will need to find your own documents online since we do not have access to the library that is referenced.
5. This video is not a Terry White video, but it does give you an overview of the application. You are to list 10 things / skills you learned from the video. You should have a minimum of 3 sentences for each item on the list.
***Remember that this document should be a resource guide for you as we go thru each program. The more information you have the better this resource will be. We will be getting much deeper in each of these applications, we are just scratching the surface.
6. I would encourage you to attempt the skills in this video. Stop the video, practice, maybe rewind, and LEARN the skill that he is demonstrating. Create your own small animation.
7. When you have completed the video tutorial and the document, Print the document and submit. Remember to include your name, class hour and the name of the software at the top of the document.
8. If you finish and have extra time, this is your "Explore" time. Work on independent projects & practice what you have learned.
Wednesday - September 11th:
First, finish your 10 things from Illustrator assignment from yesterday before moving on.
We will be moving on to the Terry White InDesign CC video (10 things beginners what to know in InDesign CC) and complete the following activities:
1. Create a new Google Doc titled 10 things about Adobe InDesign.
2. Begin watching the video and FOLLOW ALONG. You will open InDesign and do the skills that he shows you in the video.
3. In the document you created you should list the 10 things that Terry discusses and describe them in detail. You should have a minimum of 3 sentences for each item on the list.
4. Did I mention you should follow along with the video? As in ,do what Terry is doing in the video? You will have to stop the video, practice, maybe rewind, and LEARN the skill that he is demonstrating. FOLLOW ALONG means PRACTICE AS YOU GO!!! I met this man at a conference a few summers ago and he is the best at teaching Adobe - he knows what he's talking about and he makes it really easy to follow and understand so take advantage of what he has to say!
5. When you have completed the video tutorial and the document, print the document and submit. Remember to include your name, class hour and the name of the software at the top of the document.
Tuesday - September 10th:
First, finish your 10 things from Photoshop assignment from yesterday before moving on.
We will be moving on to the Terry White Illustrator CC video (10 things beginners what to know about Illustrator CC) and complete the following activities:
1. Create a new Google Doc titled 10 things about Illustrator.
2. Begin watching the video and FOLLOW ALONG. You will open Illustrator and do the skills that he shows you in the video.
3. In the document you created you should list the 10 things that Terry discusses and describe them in detail. You should have a minimum of 3 sentences for each item on the list.
4. Did I mention you should follow along with the video? As in ,do what Terry is doing in the video? You will have to stop the video, practice, maybe rewind, and LEARN the skill that he is demonstrating. FOLLOW ALONG means PRACTICE AS YOU GO!!! I met this man at a conference a few summers ago and he is the best at teaching Adobe - he knows what he's talking about and he makes it really easy to follow and understand so take advantage of what he has to say!
5. When you have completed the video tutorial and the document, print the document and submit. Remember to include your name, class hour and the name of the software at the top of the document.
Week 1: 9/3 - 9/6
Friday - September 6th:
First, finish your research assignment from yesterday before moving on.
Begin by downloading the Terry White Photoshop CC video (10 things beginners what to know about Photoshop CC) and complete the following activities:
1. Create a new Google Doc titled 10 things about Photoshop.
2. Begin watching the video and FOLLOW ALONG. You will open Photoshop and do the skills that he shows you in the video.
3. In the document you created you should list the 10 things that Terry discusses and describe them in detail. You should have a minimum of 3 sentences for each item on the list.
4. Did I mention you should follow along with the video? As in ,do what Terry is doing in the video? You will have to stop the video, practice, maybe rewind, and LEARN the skill that he is demonstrating. FOLLOW ALONG means PRACTICE AS YOU GO!!! I met this man at a conference a few summers ago and he is the best at teaching Adobe - he knows what he's talking about and he makes it really easy to follow and understand so take advantage of what he has to say!
5. When you have completed the video tutorial and the document, print the document and submit. Remember to include your name, class hour and the name of the software at the top of the document.
Thursday - September 5th:
1. Complete the safety training on the classroom website homepage. Follow ALL of the assignment instructions located there.
2. When finished, create a Microsoft Word document and complete some research about the Adobe CC software suite.
1. Complete the safety training on the classroom website homepage. Follow ALL of the assignment instructions located there.
2. When finished, create a Microsoft Word document and complete some research about the Adobe CC software suite.
- Compare and Contrast the 6 Adobe CC applications
- Photoshop, Illustrator, Dreamweaver, Animate, InDesign, & Character Animator.
- Describe the uses and capabilities of each of the 6 programs listed above.
- You must also find a similar software for each of these 6 programs that are NOT part of the Adobe CC software suite. Explain which program you would recommend as an alternative, the Adobe application or the alternative?
- Complete the assignment in MLA format.
- Paper must be 3-5 pages.