Design - 2 Hour Block
Please click on the the words Design Syllabus to download the syllabus for this class.
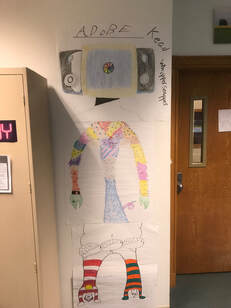
Welcome to Design and our class mascot,
" Adobe Kead Wippersnapper".
Welcome to Design and our class mascot,
" Adobe Kead Wippersnapper".
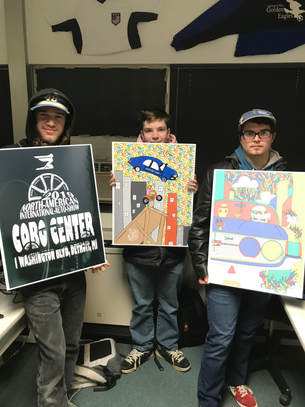
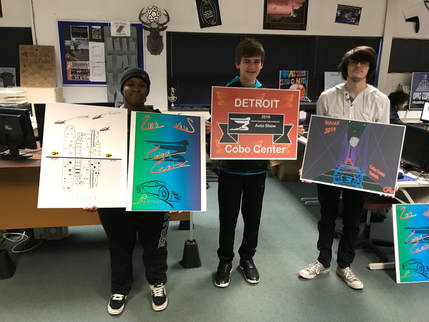
Student Work

|

|

|
|

|

|
| ||||||
|
| ||
How to Navigate the Certification:
|
| ||||
Study Guides:
|
| ||||
Quizlet Study Help
Value of ACA Certification :
Edelman Intelligence recently conducted in-depth research on the impact ACA certification can have on the success of an aspiring creative professional. View the report below.
Edelman Intelligence recently conducted in-depth research on the impact ACA certification can have on the success of an aspiring creative professional. View the report below.
| final_aca_info_cta.pdf |
More Key Benefits:
- Measure success by incorporating exams into current courses
- Prove students hands-on knowledge through authentic assessment of application experience
- Meet the popular demand to validate skills in the Adobe applications
- Take advantage of today’s industry standard digital software and official Adobe certification
- Enhance your courses with free curriculum from Adobe Education, which maps to the exam objectives
Certification Leads to Success:
"Getting my ACA certification has made all the difference in my education and my career! Because I was trained early on, I was able to attend Full Sail University with confidence. I received my BS in Digital Art and Design. It was a dream come true attending that college and it wouldn’t have been possible without dedication and a natural talent that came with being trained through ACA certification. I’m currently starting my own business".
– Michael Gribbin, Post Falls, Idaho
"As soon as I received my certifications, I started job hunting. Having these certifications gave me a distinct advantage and I was hired within a matter of days to work as a junior graphic designer for a well-known printing company".
– Renae Dawson, Roleystone, Australia

|
|
Semester Two
Week 34: 5/13 - 5/17
Thursday - May 16
Final Exam:
For your final exam you will be able to demonstrate the skills and talents that you have in the Adobe Software of your choice. You may choose to create a project using Photoshop, Illustrator, InDesign, or Animate. You may customize your project, but it must meet the requirements of the rubric that is specific to the software application that you chose. Consider this your capstone project for the year – you have the opportunity to demonstrate your proficiency in the design program that you like best!
Things to think about:
1. You may use more than one software to create your final exam project, but you must choose only 1 program to be graded on. For example: you may use Illustrator to create a character to use in your Animate animation, but you would be graded on the Animate Rubric for your animation, not your character from Illustrator. You will have the rest of your time in this class on this final exam project – think about that when you are choosing what your final project will be.
2. Plagiarism…don’t do it! Your project must be original work. DO NOT COPY AND PASTE. If you choose to use someone else’s work you will receive a 0 for the final exam.
3. When you choose your project, remember this is your final exam. You need to understand this software because you cannot ask for help from your peers or myself.
4. Your project is due at the end of class on your final day in class. No matter where you are at on your project, you must submit it at the end of your final design class period.
5. READ YOUR RUBRICS!!! Each rubric is specific to the Adobe Software application program that you choose. Make sure you read through the excellent column in order to understand everything that you will be graded on. Your rubrics can be found below.
6. Print the rubric for the program that you have chosen to use for your final exam. You will submit this rubric at the end of the exam time.
7. If you choose to use Animate: Submit your final product via email and submit your rubric to me with your name on it.
If you choose to use InDesign, Photoshop, or Illustrator: Print and submit your rubric and your final products in color in person. Be sure to include your name on your final product and rubric. You will also need to submit your files via email as well.
Happy Designing and Good Luck!
|
| ||||
|
| ||||
Dreamweaver Website Rubric below
| revised_rubric.docx |
Wednesday - May 15th
|
11. Advanced Techniques in Adobe Dreamweaver CC.
|
12 Adding Interactivity to your web site.
|
|
|
|
Tuesday - May 14th
1. Pick up where you left off before moving on to your next video lesson. Have Adobe Dreamweaver open, do, follow along, take notes, AND TAKE YOUR TIME. Stop the video and practice what is being taught. Each video lesson you will be turning in a Video Review Sheet. This document is a review of that was taught, what was learned, links, files, buttons, everything covered in the video. This needs to be specific. You may even want to use a screen shot to show a certain skill, or draw pictures to show tabs used. This is your Assignment for every video lesson. Print and turn in, and save for future use. Download the video below.
As you go through these lessons, start customizing your web pages. Have fun!
|
9. Working With HTML in Adobe Dreamweaver CC.
|
10. Find and Replace in Adobe Dreamweaver CC.
|
|
|
|
Monday - May 13th
1. Pick up where you left off before moving on to your next video lesson. Have Adobe Dreamweaver open, do, follow along, take notes, AND TAKE YOUR TIME. Stop the video and practice what is being taught. Each video lesson you will be turning in a Video Review Sheet. This document is a review of that was taught, what was learned, links, files, buttons, everything covered in the video. This needs to be specific. You may even want to use a screen shot to show a certain skill, or draw pictures to show tabs used. This is your Assignment for every video lesson. Print and turn in, and save for future use. Download the video below.
As you go through these lessons, start customizing your web pages. Have fun!
|
6. Moving your site to the Internet.
|
7. Working with Tables in Dreamweaver CC.
|
8. Page Layout in Dreamweaver CC.
|
|
|
|
|
Week 33: 5/6 - 5/10
Friday - May 10th
1. Pick up where you left off before moving on to your next video lesson. Have Adobe Dreamweaver open, do, follow along, take notes, AND TAKE YOUR TIME. Stop the video and practice what is being taught. Each video lesson you will be turning in a Video Review Sheet. This document is a review of that was taught, what was learned, links, files, buttons, everything covered in the video. This needs to be specific. You may even want to use a screen shot to show a certain skill, or draw pictures to show tabs used. This is your Assignment for every video lesson. Print and turn in, and save for future use. Download the video below.
As you go through these lessons, start customizing your web pages. Have fun!
5. Importing Images in Adobe Dreamweaver CC
4. Adding Links in Adobe Dreamweaver CC
Thursday - May 9th
1. Pick up where you left off before moving on to your next video lesson. Have Adobe Dreamweaver open, do, follow along, take notes, AND TAKE YOUR TIME. Stop the video and practice what is being taught. Each video lesson you will be turning in a Video Review Sheet. This document is a review of that was taught, what was learned, links, files, buttons, everything covered in the video. This needs to be specific. You may even want to use a screen shot to show a certain skill, or draw pictures to show tabs used. This is your Assignment for every video lesson. Print and turn in, and save for future use. Download the video below.
1. Pick up where you left off before moving on to your next video lesson. Have Adobe Dreamweaver open, do, follow along, take notes, AND TAKE YOUR TIME. Stop the video and practice what is being taught. Each video lesson you will be turning in a Video Review Sheet. This document is a review of that was taught, what was learned, links, files, buttons, everything covered in the video. This needs to be specific. You may even want to use a screen shot to show a certain skill, or draw pictures to show tabs used. This is your Assignment for every video lesson. Print and turn in, and save for future use. Download the video below.
3. Intro to Cascading Style Sheets in Adobe Dreamweaver CC
Wednesday - May 8th
1. Pick up where you left off before moving on to your next video lesson. Have Adobe Dreamweaver open, do, follow along, take notes, AND TAKE YOUR TIME. Stop the video and practice what is being taught. Each video lesson you will be turning in a Video Review Sheet. This document is a review of that was taught, what was learned, links, files, buttons, everything covered in the video. This needs to be specific. You may even want to use a screen shot to show a certain skill, or draw pictures to show tabs used. This is your Assignment for every video lesson. Print and turn in, and save for future use. Download the video below.
1. Pick up where you left off before moving on to your next video lesson. Have Adobe Dreamweaver open, do, follow along, take notes, AND TAKE YOUR TIME. Stop the video and practice what is being taught. Each video lesson you will be turning in a Video Review Sheet. This document is a review of that was taught, what was learned, links, files, buttons, everything covered in the video. This needs to be specific. You may even want to use a screen shot to show a certain skill, or draw pictures to show tabs used. This is your Assignment for every video lesson. Print and turn in, and save for future use. Download the video below.
2. Working with Text in Adobe Dreamweaver CC
Tuesday - May 7th
Today we will begin Adobe Dreamweaver CC. We want to stay together as a class, so use your time wisely. This is very important, don't get left behind. Our approach to this application will be a little different than the others due to the complexity of Dreamweaver. We will be going through a video series to learn this application. It will be very important that you take your time. Remember, your are still responsible for any missing work. Unfortunately, due to our limited days, you will not be completing the entire video series.
1. For today, create a Word document and answer the following questions.
A. Decide what type of site you would like to create. It can be a personal site about you, a business site that promotes a fictitious or real company, or an informational site that provides information about a topic, cause, or organization. It must be classroom appropriate. Print and turn in, save for future reference.
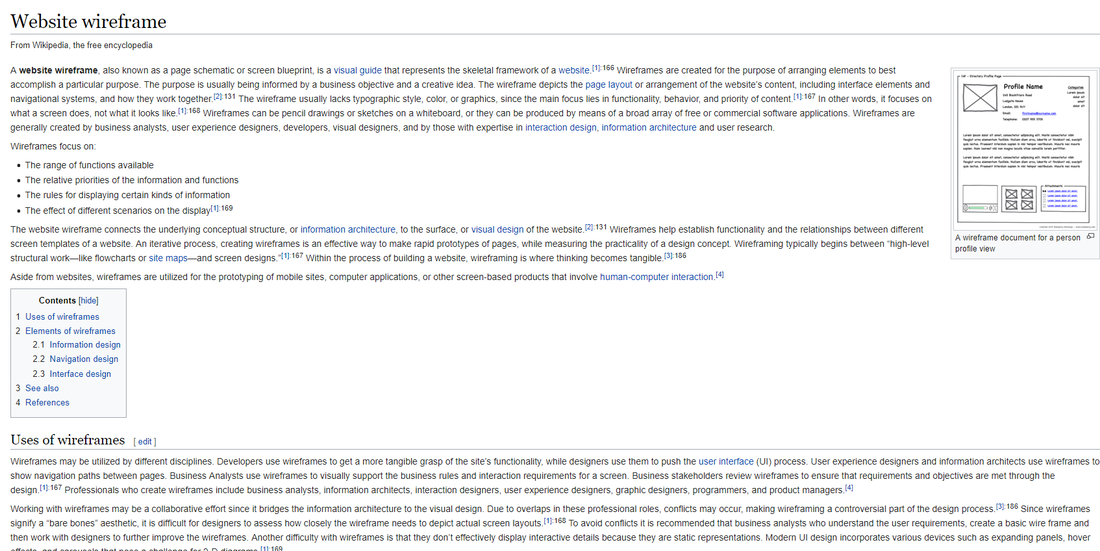
B. Create a wireframe for your site to include at least 4 pages. The wireframe should include the home page with at least 3 pages under it. See example and link below to understand what a wireframe is. Print and turn in, save for future reference.
C. Create a local assest folder to house your assests. Begin collecting content for your web page. Such as pictures, graphics, content, personal designs, logos, ect....Keep these in a central location that will be accessable to you as you develop your web site.
2. Next, begin your first video tutorial. Have Adobe Dreamweaver open, do, follow along, take notes, AND TAKE YOUR TIME. Stop the video and practice what is being taught. Each video lesson, you will be turning in a Video Review Sheet. This document is a review of that was taught, what was learned, links, files, buttons, everything covered in the video. This needs to be specific. You may even want to use a screen shot to show a certain skill, or even draw pictures to show tabs used. This is your Assignment for every video lesson. Print and turn in, and save for future use. Download the video below.
Today we will begin Adobe Dreamweaver CC. We want to stay together as a class, so use your time wisely. This is very important, don't get left behind. Our approach to this application will be a little different than the others due to the complexity of Dreamweaver. We will be going through a video series to learn this application. It will be very important that you take your time. Remember, your are still responsible for any missing work. Unfortunately, due to our limited days, you will not be completing the entire video series.
1. For today, create a Word document and answer the following questions.
A. Decide what type of site you would like to create. It can be a personal site about you, a business site that promotes a fictitious or real company, or an informational site that provides information about a topic, cause, or organization. It must be classroom appropriate. Print and turn in, save for future reference.
B. Create a wireframe for your site to include at least 4 pages. The wireframe should include the home page with at least 3 pages under it. See example and link below to understand what a wireframe is. Print and turn in, save for future reference.
C. Create a local assest folder to house your assests. Begin collecting content for your web page. Such as pictures, graphics, content, personal designs, logos, ect....Keep these in a central location that will be accessable to you as you develop your web site.
2. Next, begin your first video tutorial. Have Adobe Dreamweaver open, do, follow along, take notes, AND TAKE YOUR TIME. Stop the video and practice what is being taught. Each video lesson, you will be turning in a Video Review Sheet. This document is a review of that was taught, what was learned, links, files, buttons, everything covered in the video. This needs to be specific. You may even want to use a screen shot to show a certain skill, or even draw pictures to show tabs used. This is your Assignment for every video lesson. Print and turn in, and save for future use. Download the video below.
Monday - May 6th
Today you will complete a Web Design scavenger hunt & begin your journey into Adobe Dreamweaver CC.
1. Read the document below for your scavenger hunt questions. You will use the internet to search for your answers. Print and submit when done.
2. Use your time wisely. If done with time remaining today, use it to work on and turn in any missing assignments.
3. If you are done with everything, have fun with an independent project.
| web_design_scavenger_hunt.doc |
Week 32: 4/29 - 5/3
Friday - May 2nd
1. Research the following questions:
The paper should be a minimum of 2 pages.
Works Cited are required.
DO NOT COPY AND PASTE
3. Lastly, we will be watching a video about Jeffrey Zeldman. At the end of your research document please include, 15 things you learn from the video, that were not in your research paper.
4. Print off and turn in when complete.
1. Research the following questions:
- What is responsive web design?
- How is it relevant to this class? Please provide specific examples
- Who is Jeffrey Zeldman?
- How has he contributed / changed web design over the last 20 years? Please provide specific examples.
The paper should be a minimum of 2 pages.
Works Cited are required.
DO NOT COPY AND PASTE
3. Lastly, we will be watching a video about Jeffrey Zeldman. At the end of your research document please include, 15 things you learn from the video, that were not in your research paper.
4. Print off and turn in when complete.
Week 30: 4/15 - 4/19
Wednesday - February 28th:
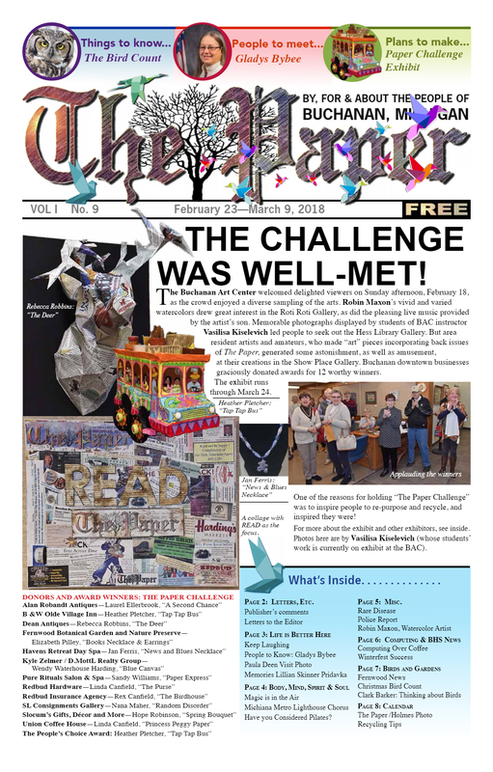
Let's get published! We will need to pause on Animate for a moment. We have an opportunity to get your work published in the local paper. Each issue of "The Paper" has a unique header depending on the season, what's going on around town, world events, holidays, ect....... You will be creating and submitting the next header for the cover page, for the May 3rd issue.
I will show you some examples in class, also below is the header file, and an example of the most recent cover page. I have spoken to the Paper, and they will give feedback on the ones they like, and will give credit in the paper to the student artist. This is a big opportunity, so let's take advantage of it.
See her exact e-mail below:
Hi Russ!
I've attached the logo base (psd) for the May 3 - Pets issue.
I've also attached the flyer so they can see what the section will look like - but their design doesn't need to resemble that.
We'll need to settle on a final design by April 26.
Thanks, and hope this is enough info, if not please feel free to call me.
Pat
Patricia Banker, Editor
Here are some of the "rules".
1. You must keep the font provided.
2. You must keep the Red Bud Tree.
3. Include the text, "By, For & About The People of Buchanan, Michigan", close to the same location provided.
4. Keep the lens flair look on the letter "T", on THE.
. Have fun. E-mail me your final design file. In the subject line include, "The Paper & your name".
Submittals & Responses Below:
|
| ||||||||
Wednesday - April 17th:
Animate CC Tutorial Presentation Project
1. Find a tutorial for Animate that you can do from start to finish. (remember to choose Adobe Animate CC)
* Challenge yourself and try something new!
* This tutorial should teach us all something new.
* Remember to watch and learn the entire tutorial to make sure it is something you can actually MASTER and TEACH!
* Once you have selected a tutorial you need to run it by me for approval BEFORE you begin working on it.
Remember:
1. FOLLOW THE RUBRIC....after you've read the rubric then proceed to step #2.
2. Try to be realistic...your tutorial shouldn't take 6 weeks to master. Find something challenging, but manageable.
2. Complete the project and MASTER the skill. You must be able to show the class how to do the skill and answer questions about it as well.
3. Teach the class how to do your chosen project without using the original tutorial.
* You will get in front of class and use the teacher computer and projectors to show your skill to the class.
* You will take the class from start to finish and answer their questions as you go thru.
* When choosing your lesson, remember that your classmates need to be able to complete it in 1 single class.
* You must have a handout for your peers and Mr. Philip as a guideline for your skill.
You will be graded on:
1. The original product that you complete using the tutorial (using the Animate CC assignment rubric)
2. The lesson you give in class (remember this needs to be able to be completed in 1 class session)
3. The handout you create for your classmates.
4. The difficulty of the skill.
Challenge yourself and your classmates and remember REVIEW THE RUBRIC!
Remember to verify that the tutorial you choose is Animate CC.
******We will start these tutorials Friday, April 19th, so use your time wisely*******
|
| ||||
Below are some resources you can use if you like when deciding on your skill to teach. You may need to do research on your own to find your Animate skill.
Week 29: 4/8th - 4/12th
Friday - April 11th:
Today we begin Adobe Animate CC! To get started, open up Animate CC, and watch the video below. (you will need headphones) Follow along as he covers each learning section. Do what he does, stop and explore each skill / tool as you move through. This will take some time, so have patience as you learn this new and very cool application. Also the link below will give you some keyboard shortcuts that will help make things easier as we learn Animate.
Learning Section:
1. Workspace & Setup.
2. Tools & Properties.
3. Drawing & Coloring.
4. Timeline & Utilities.
5. Animation Basics.
6. Filters & Effects.
7. Libraries.
8. Publishing your projects.
Thursday - April 11th:
Before we begin Adobe Animate CC, we will learn how animation came to be what it is today. The video, The Pixar Story, will take us behind the scenes of the groundbreaking company that pioneered a new generation of animation and forever changed the face of filmmaking.
1. Create a word document, list and describe 20 things you learned about animation, Pixar, and/or filmmaking.
2. Print and turn in when complete.
Monday - April 8th:
Due to Spring testing, and the fact that you are not in class the next two days, today we will have some design fun! Finish all prior projects before moving on. You can use any Adobe software you like.
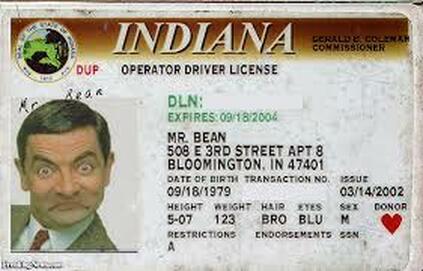
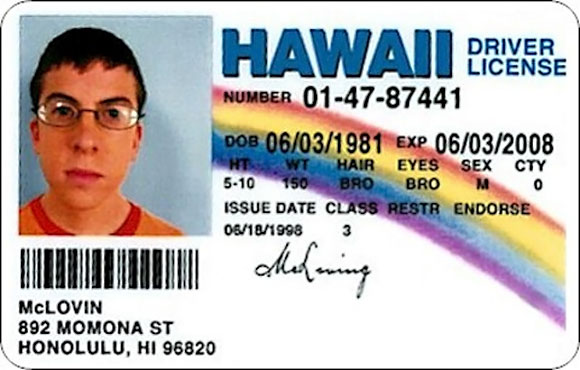
1. Create a parody Driver's License. This should look like a real driver's license, should be funny, so be creative. You may not copy and past. You must complete 2 different driver's licenses. Be sure to look on line to determine how different state licenses look. (see examples bellow of McLOVIN and Mr. Bean)
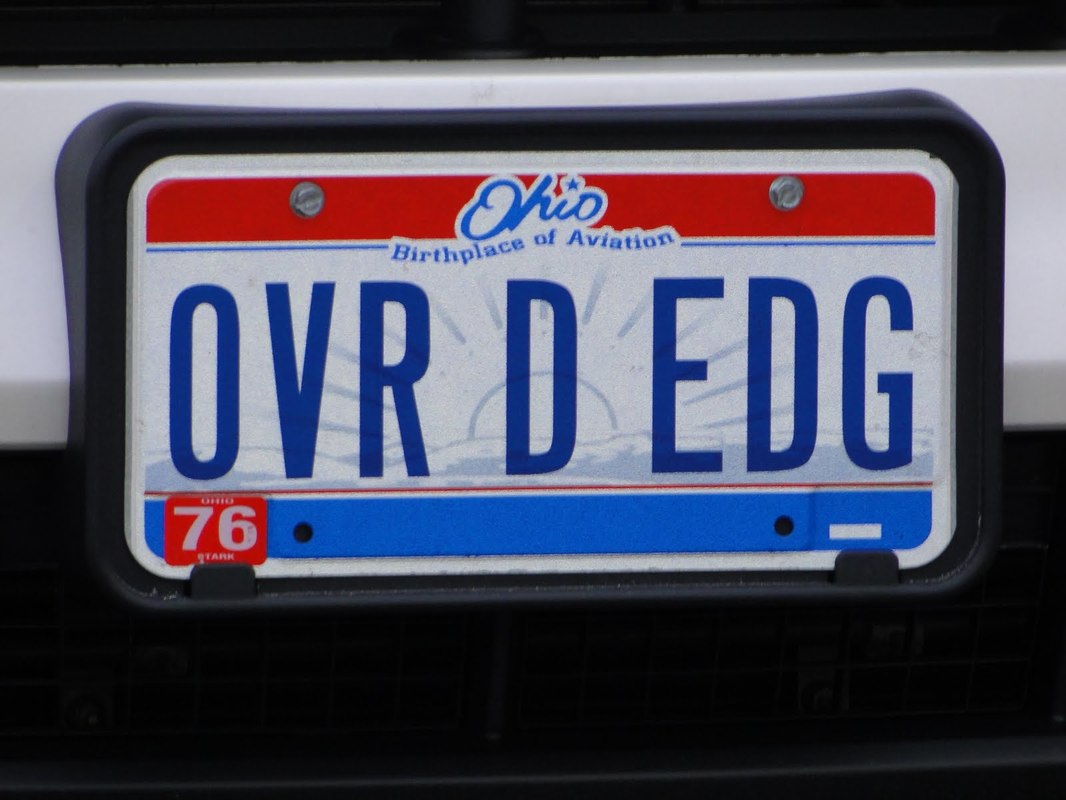
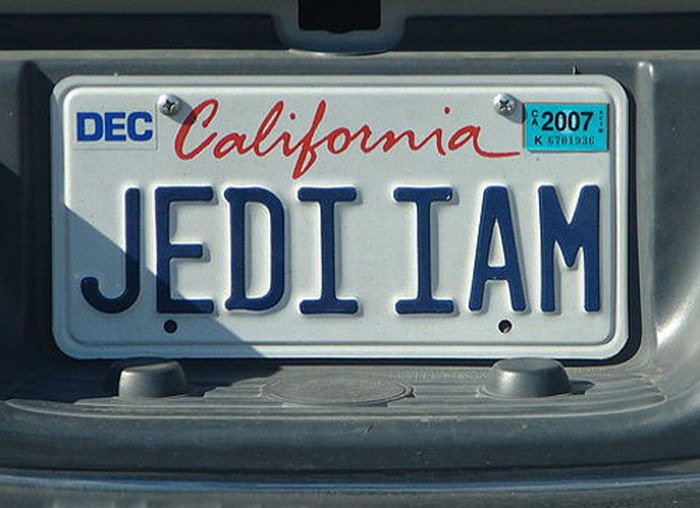
2. Create a vanity plate. Again, this should look like a real license plate and reflect the state that you have chosen. Be creative and do not just choose the state of Michigan. You must complete 2 different vanity plates. Text & Font type is a big part of this one.
3. Create a meme. Find or create a school appropriate picture and create a meme for it. Be creative and appropriate. You should complete 2 different Meme pictures.
Print in color & e-mail me your work. Have fun!
***This work should be creative, funny, and detailed. I'd like to post these around the room or in the halls.***
Due to Spring testing, and the fact that you are not in class the next two days, today we will have some design fun! Finish all prior projects before moving on. You can use any Adobe software you like.
1. Create a parody Driver's License. This should look like a real driver's license, should be funny, so be creative. You may not copy and past. You must complete 2 different driver's licenses. Be sure to look on line to determine how different state licenses look. (see examples bellow of McLOVIN and Mr. Bean)
2. Create a vanity plate. Again, this should look like a real license plate and reflect the state that you have chosen. Be creative and do not just choose the state of Michigan. You must complete 2 different vanity plates. Text & Font type is a big part of this one.
3. Create a meme. Find or create a school appropriate picture and create a meme for it. Be creative and appropriate. You should complete 2 different Meme pictures.
Print in color & e-mail me your work. Have fun!
***This work should be creative, funny, and detailed. I'd like to post these around the room or in the halls.***
|
|
|
|
Week 27: 3/18th - 3/22nd
Thursday - March 21st:
Finish your brochure before moving on with this final project. This will take several days, and will be our last InDesign project. Yippie! Read the entire document so that you fully understand the expectations of this project. This will be a large grade and I expect you to use your time wisely.
1. Download the document and read it through the entire way. You have a total of 6 items that must be submitted.
2. Complete the assignment. As always this must be original work.
3. Proofread, make corrections and make sure to review and follow the rubrics.
4. Print and submit your project when you are done. Attach the document below with all your projects and turn in.
| wacky_water_slidz.doc |
Tuesday - March 19th:
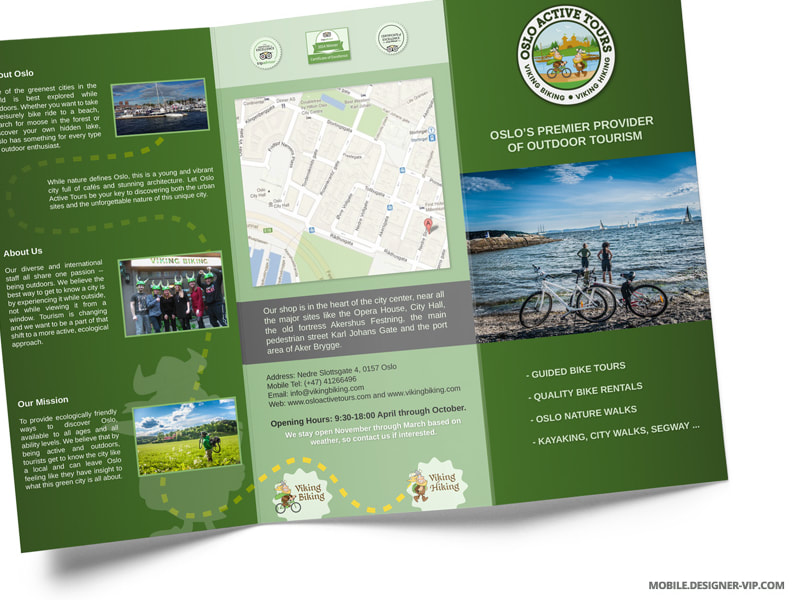
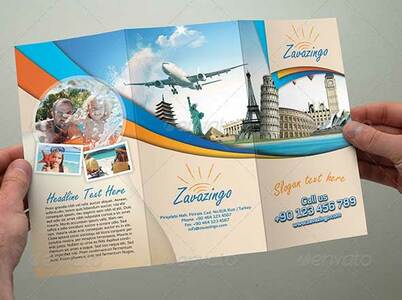
We are about done with InDesign, so hang in there. Your next to last project is you will be creating an International Travel Brochure with InDesign. See the instructions and rubric below. You may want to research a few examples before getting started. I'm looking for attention to detail, correct layout, and readability. Where will you go? E-mail me your final brochure, also print in color, fold correctly, and turn in.
We are about done with InDesign, so hang in there. Your next to last project is you will be creating an International Travel Brochure with InDesign. See the instructions and rubric below. You may want to research a few examples before getting started. I'm looking for attention to detail, correct layout, and readability. Where will you go? E-mail me your final brochure, also print in color, fold correctly, and turn in.
| international_travel_brochure.doc |

|
|
|
|
Monday - March 18th:
Create a word document:
1. Use the link below, and list and describe the 8 things, Graphic Designers need to know for film. 2. Who is Annie Atkins? Tell me about her career, experience, her work, ect..... |

|
|
See the below PDF's, for both ads. She wanted them re-done Friday, but we were not in class. So they said late Monday morning should work. See her e-mail below when finding out we did not have class. So find your Ad, make the suggested changes, and send back to me ASAP. Keep up the good work! The Paper Mar 15, 2019, 8:30 AM (2 days ago) to me Hah! Of course...looks like the start of a great day LOL. Late Monday morning would be fine. Worst case scenario, I'll adapt the one I think is best and give the student credit... Have a good weekend! |

|
|
| ||||
Week 26: 3/11th - 3/15th
|
Thursday - March 14th: Third Ad Order. See below.
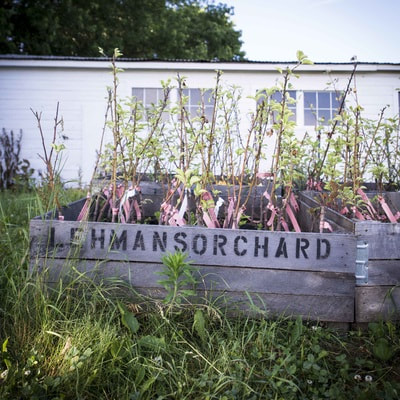
The Paper keeps sending us work. This next job is to do a redesign of the two below Real Estate Ads. They are having readability issues during print. Both need to be similar in nature. Can you find the typo? See the clients e-mail below. If you can just fix the readable issue, that should do it. The Paper Hi Russ, Here are two ads that we'd love to have your students work on. One is completely new (Lehmans) and the others just needs to be "fixed" so that it's readable. I didn't run it in this issue because the contrast has been so poor when it's printed. But you can see it in the last one, the one with the Herd Winterfest on the front page. I've attached the original. (Part of the problem might be because it's a gif.) |

|

|

|
|
| ||||
Wednesday - March 13th
1. Finish your Paper Ad assignments before moving on.
2. You will creating the front page of a newspaper in InDesign. This project requires you to do a little research about the civil rights movement - read the entire assignment so you can get the information you need BEFORE you begin.
***I am including some images of examples to give you an idea of what type of quality I am looking for in your project. They need to have the look and feel of a newspaper front page***
3. Print and submit your final newspaper front page in color.
| indesign_project_8-front_page_of_newspaper.docx |

|

|

|
|
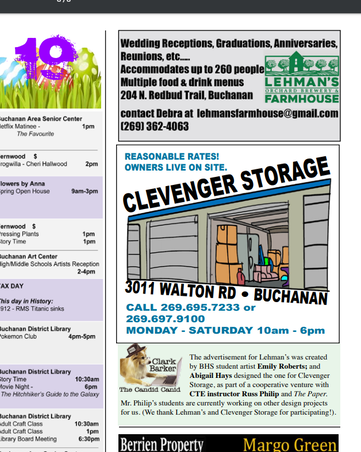
Monday - March 12th: Second Ad Order. See below.
This just in.... 4x4" size"I do not have a logo so we needn't worry about that. Here is the info I would like in my ad; Clevenger Storage, 3011 Walton Road, Buchanan, Mi., 269-695-7233 or 269-697-9100. Hours are Monday - Saturday 10am to 6pm . Owners live on site. Reasonable Rates. I think some kind of graphic or clip art would be nice....They can have till Thursday, if Wednesday is too soon--although they're pretty quick! Thanks! Patricia Banker, Editor |

|
|
Monday - March 11th: Let's get published! Below are our first local papers design orders. This is a huge opportunity to get published in print. Plus, you will get you name credited for your work in the paper. 1. Our first project is to create a new advertisement, from scratch, for Lehman's Farmhouse. Please include the information below in the ad.
300 dpi is best. Jpg. 2. You can use Illustrator & Photoshop, but your final advertisement must be in InDesign. And as always, must be original work. E-mail me your final ad for submittal. |

|

|
|
Week 25: 3/4th - 3/8th
Tuesday - March 4th:
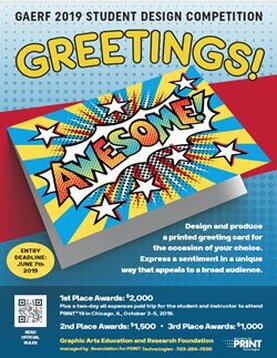
Today we begin our first InDesign Contest! You will be creating a Greeting Card! With a 1st place prize of $2,000 in prize money! The 2nd & 3rd place are not too shabby either. See the link below for Rules, Tips, Guidelines & FAQ's. You are responsible to read these. The Design Requirements are your rubric.
Did I mention to read the Guidelines?
You may want to print multiple copies as you adjust your design. We will be printing our final cards on special cardstock. Come see me when you are finished. I will need your digital version and printed version for submittal. You may use Illustrator and /or Photoshop for your design, but it all must be original work, and completed in InDesign. You might want to research some greeting cards / designs to get started. Have fun and good luck!
See the video below if you need help setting up your greeting card.
|
|
| ||
Week 24: 2/25 - 2/29
|
Thursday - February 28th:
Our next activity in Adobe InDesign is two-fold. First: 1. In the video below you will learn 5 gems in InDesign and a few bonus features. These will help you with future InDesign projects. 2. Open Adobe InDesign CC, watch the video, follow along and practice the 5 gems Terry discusses. 3. Create a word document. List and describe the 5 gems and any bonus features learned in the video. Print and turn in. Second: 1. This next project you will be creating a calendar from scratch. 2. Watch the video to the right and follow along. 3. Your design, your images, your calendar can be about anything you want. Your family, your passion, your artwork, anything. 4. You will need to include all federal holidays, and any other meaningful days you want to include in your calendar. (birthdays, silly days, ect..) 5. Print and staple, make it look like a calendar the best you can & e-mail me your InDesign file. 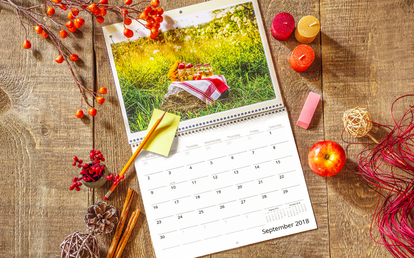
|
|
Week 23: 2/18 - 2/22
Thursday - February 21st:
Today we begin our first InDesign Project. You will be creating your very own Menu!
1. See the document below for project instructions and the rubric.
2. You might want to research some menu's to get an idea. See some examples below.
3. Be creative, have fun, but make it look professional. You can use Illustrator & Photoshop in this project, but the Menu must be created in InDesign, and must all be original work.
4. When complete, print final menu in color and turn in.
6. E-mail me your final InDesign file.
7. Don’t forget about the peer review, and the feedback document at the end.
| indesign_menu_project.doc |
|
|
Tuesday - February 19th:
Continue working in the InDesign textbooks..
For today: This is our last InDesign Chapter! :)
1. Pick up where you left off from Friday before moving on.
2. Read and follow along in chapter 9, Working with Tab and Tables. (we are skipping chapter 8)
3. Complete Skills Review. (9-38)
3. Complete Project Builder 1. (9-40).
3. Complete Project Builder 2. (9-41).
4. Complete Design Project. (9-42)
6. Complete the Portfolio Project. (9-43)
7. Save and E-mail me your final assignment files. Be sure to include your name & assignment in subject line.
8. Don't forget your Doodle Googles are due March 1st.
Week 22: 2/11 - 2/15
Tuesday - February 12th:
Continue working in the InDesign textbooks..
For today:
1. Pick up where you left off from yesterday before moving on.
2. Read and follow along in chapter 7, Creating Graphics.
3. Complete Skills Review. (7-34)
3. Complete Project Builder 1. (7-36).
3. Complete Project Builder 2. (7-37
4. Complete Design Project. (7-38)
6. Complete the Portfolio Project. (7-39)
7. Save and E-mail me your final assignment files. Be sure to include your name & assignment in subject line.
Monday - February 11th:
After we complete our Adobe Certifications, continue working in the InDesign textbooks..
For today:
1. Pick up where you left off from Friday before moving on.
2. Read and follow along in chapter 6, Working With Placed Images.
3. Complete Project Builder 1. (6-49).
4. Complete Design Project. (6-51)
6. Complete the Portfolio Project. (6-52)
7. Save and E-mail me your final assignment files. Be sure to include your name & assignment in subject line.
Week 21: 2/4 - 2/8
Thursday - February 7th:
Today we continue the textbook working with Adobe InDesign CC. You might need to reference your 10 Things document you completed at the start of the year.
For today:
1. Pick up where you left off from yesterday before moving on.
2. Read and follow along in chapter 5, Working With Color.
3. Complete Skills Review. (5-38).
4. Complete Project Builder 2. (5-41)
5. Complete the Design Project. (5-42)
6. Complete the Portfolio Project. (5-43)
7. PREPARE FOR YOUR ACA CERTIFICATION! The plan is for Friday testing.
Wednesday - February 6th:
Today we continue the textbook working with Adobe InDesign CC. You might need to reference your 10 Things document you completed at the start of the year. Or even review the video below.
For today:
1. Pick up where you left off from yesterday before moving on.
2. Read and follow along in chapter 3, Setting Up A Document.
3. Complete Project Builder 1. (3-60).
4. Complete Project Builder 2. (3-61)
5. Complete the Design Project. (3-62)
6. Complete the Portfolio Project. (3-63)
7. Read and follow along in chapter 4, Working With Frames.
8. Complete Project Builder 1. (4-60)
9. Complete Project Builder 2. (4/61)
10.Complete Design Project. (4-62)
11. Complete Portfolio Project. (4-63)
12. Save and E-mail me your final assignment files. Be sure to include your name & assignment in subject line.
13. Don't forget about your Doodle Googles.
14. START STUDYING & PREPARING FOR YOUR ACA CERTIFICATION! See the resources above.
Tuesday - February 5th:
Today we get back into the textbooks and start Adobe InDesign CC. You might need to reference your 10 Things document you completed at the start of the year. Or even review the video below.
For today:
1. Read and follow along in chapter 1, Getting to know InDesign.
2. Complete Project Builder 2 (1-43).
3. Complete the Design Project. (1-44)
4. Complete the Portfolio Project. (1-45)
5. Read and follow along in chapter 2, Working with Text.
6. Complete Project Builder 1 & 2. (2-42/43)
7. Complete Design Project. (2-44)
8. Portfolio Project. (2-45)
8. Save and E-mail me your final assignment files. Be sure to include your name & assignment in subject line.
9. Don't forget about your Doodle Googles.
10. START STUDYING & PREPARING FOR YOUR ACA CERTIFICATION! See the resources above.
Semester One
Week 18: 1/14 - 1/18
Wednesday - January 16th
Final Photoshop / Illustrator Project: Today we start your final exam project. Please reference and read the entire handout for the rubrics and directions for your final semester exam. While we will discuss some of the key ideas in class, YOU are responsible for all of the information in the exam packet. Please be sure to read the entire packet carefully so that you understand what is expected. Please see me with any questions. This will be due at the end of the class / exam time on Wednesday, January 23rd. Use your time wisely. You have 5 days to finish this finals project. Hint: Follow each rubric & attention to detail is key to success. Also, see the last page regarding this Final Project Submission. This is worth 200 points. Good luck! (please print and submit AND submit via email!)
This is to be done own your own. Not with help from your peers.
| real_estate_project_-_illustrator.doc |
Week 17: 1/7 - 1/11
Wednesday - January 9th: Today we start the Doodle 4 Google contest. See the information and details below!

The 2019 Doodle for Google theme is: When I grow up, I hope…..
This year’s theme invites you to show us what you hope for in your future. Classrooms on Mars? Shoes that can fly? Food for everyone? A pill that cures everything? Take your ideas and put them into your Doodle! The winner’s artwork will be made into an interactive doodle on Google.com as well as loads of scholarships and prizes.
See the link to the contest below, along with the entry form. We will review this in class, but you are responsible to review the contest requirements.
This is the Doodle 4 Google 2017 - US Winner

Some more examples are below. Remember being a "Google Doodler" is a real career! How fun would that be?

|

For more inspiration, click below to see more of the doodle team's work!
|

|
Monday - January 7th:
Welcome back. Today we will start an assignment using our digital cameras and Distorted Perspective / Illusion Photography. But before we do, I want to share with you one of the most influential Photographers around. His name is Jeremy Cowart. Take a moment to review his web sights below, look at his work, and what projects he has done and is currently working on. We will watch a short video in class to understand his journey.
You will print and turn in on 1 document:
1. 10 Things you learned reviewing his web pages. If the site below is blocked, you will need to research him/& or his work, to discover your 10 things learned about this Photographer. Trust me there is plenty of information available out there.
2. 10 Things you learned from the short video & what are your thoughts or feelings about this photographer?

Distorted Perspective / Illusion Photography
This is not the easiest activity to do, so do your best, think outside the box, be creative! You may use the internet to get ideas, but this needs to be original work. Take your time, have fun!
Your assignment is to create 3 unique distorted perspective / illusion photos using the digital cameras. You can use images in the room, halls, gym, almost any where in the building, or even outside. (Please do not disrupt other classes to take pictures!) The images used for this assignment, must be taken by you NOT taken from the internet!
Once you think you have the photos you need you may use any Adobe software you like to create your distorted / illusion photos. Keep in mind the three rules to follow from the video:
1) The photos combined should have the same perspective.
2) The photos combined should have the same type of light.
3) Make it impossible to see where the images begin and end. Making the photos seamless.
When complete:
1. E-mail me all 3 files, so I can see layers and such.
2. Print all 3 in color and turn in the box. Please put your name on the back.
|
|

|
|
Week 16: 12/17 - 12/21
Monday - December 17th:
This week we will be having a little holiday fun and having our very own class Ugly Sweater Contest. Instead of wearing the sweaters, you will be designing them!!! See some examples below, we will see who can create the ugliest sweater. You will be using Adobe Illustrator CC. Grab your virtual knitting needles because we're going to follow the tutorial so your sweater looks like a real knitted sweater.
We'll begin by creating a tiny stitch-like graphic, which we'll then re-color using the Live Paint tool to build up an intricate festive knitted pattern. The kind of pattern you create is entirely up to you. Create complex patterns or even graphics of reindeer, Christmas trees, or snowflakes out of the stitches, the possibilities are endless. This tutorial is short, but he goes fast, so you will need to focus and stop and try to follow along as he goes through the steps.
It's up to you what design you choose, you may want to google some idea, but it must be original work. What colors you use is up to you, but it is an Ugly Sweater Contest, so keep that in mind. Must Haves: 1. You must design your own sweater pattern - no copy and paste. 2. Your sweater must have the stitch like graphic effect. 3. It must have a holiday theme. Feel free to use a little humor in your deign. We will vote as class at the end of this assignment, and the 1st , 2nd, & 3rd place winners will win a white elephant gift. Use your time wisely. I will give you more than 1 day to work on this project, but be sure to stay on task! Have fun and happy holidays!

|

|

|

|

|

|
Week 15: 12/10 - 12/14th
Thursday - December 13th:
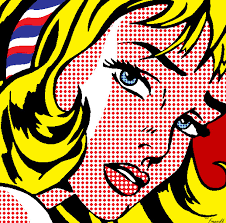
Today you will be learning about Pop Art and Andy Warhol. After watching the video as a class complete the following activities:
1. After watching the video, list 15-20 things you did not know about Andy Warhol.
2. List 15-20 things you did not know about Pop Art.
3. Create two pop art images using the tutorial below (or use your own technique of pop art. Pick a famous person and also use yourself or a peer for your creations. You may use either Photoshop or Illustrator for this assignment.
4. Submit the following:
- 2 lists created from video
- 2 pop art images that you create

|

|
|
Pop Art Tutorial >>> |
|
Tuesday - December 11th:
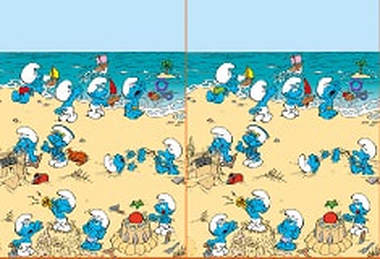
Today you will create your own version of a spot the difference game. This is different than the hide the image game. In this activity you need to make subtle changes that blend into the picture. For example you might add an extra motor boat in the marina, you might remove a person, or you might add flags to a tower...Be creative, but remember that whatever changes you make must look like they are a natural part of the picture.
You will need to include at least 25 differences between the two pictures. You can use any image you like, you may use Photoshop or Illustrator and you must include an answer key in addition to your project. When done, print the original image, your image with your difference, and your answer key. Your answer key should be your image with a red circle around each the different items & a list of differences. Plus, e-mail me your files, I want to see your layers.
Have fun and be creative! Make these challenging! Your peers will be trying to find your image differences. Some examples are below.
|

|

|
|
Monday - December 10th
Being creative is easy for some of us and harder for others. So how can you be more creative?
Step 1:
We will watch a short video on how to be more creative before moving on to the document below.
Step 2:
The document gives you 27 tips on how to be more creative in art, business, life, whatever. Open the PDF and read it!
Step 3:
Create a word document and answer the following questions:
1. According to the video, what are the 6 things needed to unlock creativity? The speaker refers to these 6 things as her "innovation engine". Please list.
2. From the article, list and describe 15 of the 27 tips. Rank them in order of those you find the most important to the least important.
3. In your descriptions of the tips, explain why you agree or disagree with that tip.
*Remember, you can put tips on your list that you disagree with as long as you explain why you felt they needed to be included in your list.
4. Based on the video's discussion of habitats, how effective is our habitat here at the High School? How could we make our habitat more conducive to creativity? Think about our classroom and your specific high schools as well.
5. Research and find 2 other articles/web pages/links that discuss ways to be more creative.
6. Give a brief description of the 2 sites you found.
7. Lastly, give a bio on all 3 of the authors from this assignment. Include the article I provided as well as the 2 articles that you found. Learning about the authors of an article will help determine if they are a credible source, so be specific. Each bio should be a minimum of 1-2 paragraphs. (a paragraph should have at least 5 sentences).
Step 4:
Save and email me your final paper.
| 6.howtobecreative.pdf |
Week 14: 12/3 - 12/7th
Monday - December 3rd
Make sure you are all caught up before moving on. Today we start our first Logo Contest! See the link below to see details about this contest. Your assignment is to submit two quality Logos. We will discuss Buses By The Beach in class, but I would recommend doing research on your own to get a complete understanding of what they are all about. Have fun and good luck! These will be due this Friday, December 7th, so take your time. You will e-mail me your final Logo & you will be required to submit using your school e-mail for the final logo submission. Make sure you follow the requirements of this contest, that is your responsibility.
Turn in:
1. E-mail me your two logo files.
2. Print in color both logos.
3. 10-15 thumbnail sketches for each logo.
4. A short description of each logo. What skills did you use and your thought process when creating them.

Week 12: 11/26 - 11/30th
Thursday - November 29th:
Finish your Milton Glaser before moving on.
Step 1 for Today's Assignment: Create a Word document, Research Aaron James Draplin the designer, and Answer the questions below.
Finish your Milton Glaser before moving on.
Step 1 for Today's Assignment: Create a Word document, Research Aaron James Draplin the designer, and Answer the questions below.
- How did he get his start in design?
- Cut and paste 2-3 examples of his work.
- Cut and paste 1 image / example of his 2013 Sasquatch Festival event Graphic.
- When did he create, The Draplin Design Co.?
- Describe what you like or dislike about his work.
- How has he impacted the design industry?
- What are “Field Notes”?
- What is DDC Mission Statement?
- In 2-3 sentences, who is Chuck Anderson, the graphic designer? Include 1 image he has created.
- If you were to interview Aaron Draplin, what 5 questions would you ask him?
| aaron_j._draplin_doc..docx |
Wednesday - November 28th
Milton Glaser (b.1929) is among the most celebrated graphic designers in the United States. He has had the distinction of one-man-shows at the Museum of Modern Art and the Georges Pompidou Center. He was selected for the lifetime achievement award of the Cooper Hewitt National Design Museum (2004) and the Fulbright Association (2011), and in 2009 he was the first graphic designer to receive the National Medal of the Arts award. As a Fulbright scholar, Glaser studied with the painter, Giorgio Morandi in Bologna, and is an articulate spokesman for the ethical practice of design. He opened Milton Glaser, Inc. in 1974, and continues to produce a prolific amount of work in many fields of design to this day.
After watching the video, use your notes & your research to answer the questions in the handout you will receive at the end. These question are to be answered in MLA Format.
| milton_glaser_questions.docx |
Week 11: 11/12 - 11/16th
Personal Brand Logo Project
Wednesday - November 14th: DUE TUESDAY - NOVEMBER 20TH!
We are going to embark on our first major project in Illustrator - Creating your own, personal brand logo. This project will involve research, design, and instruction. The entire project is worth 150 points and will NOT be completed in 1 day. You will be graded on the practice activity, content of your research paper, the sketches and creation of your logo, the written step by step guidelines that you create to teach someone else how to duplicate your logo, and the recreation of your logo from your peer that used your guidelines. You will need to be thorough and specific throughout the entire process in order to be successful on this assignment. I want excellence rather than speed on this project so take your time and show me what you can do! Good luck - I know that we are going to see and learn some amazing things through this project!
:) Some things that you should keep in mind as we begin:
1. This logo should represent who you are as a person
2. Looking at the completed logo we should have a better understanding of what is important to you.
3. This must be an original design!
4. The plan is to put these on T-shirts.
Step 1: Practice
1. Watch the video on your own, taking notes as you go. (use headphones)
Have your illustrator open, stop the video as needed.
2. Create the logo that the video teaches you. There are many different steps that you will need to complete in order to recreate the logo from the video.
3. Save as a JPG. Print and submit as part of your project packet.
***I'm including a picture of the final logo that you are creating so that you have some idea of what direction you are heading with this assignment. Some of this is review, but you will learn some valuable techniques in creating a logo.
Step 2: Research
Using MLA Format...YES MLA format
You will complete a minimum 2 page research paper regarding copyright infringement. You will answer a series of questions in paper format. This means real paragraphs. A numbered paper with typed out questions and responses will NOT be accepted. You will need to answer the questions in paragraph format as if writing a research paper. The questions are designed to prompt you regarding the objective of the paper. The following question should get you started, but please don't limit yourself to answering just these questions:
- Define copyright infringement to logo designs
- What is not able to be copyrighted in design?
- What does the circled C do for you and do you need to include it on your logo/work?
- What do you need to prove if you want to sue a copycat?
- Whys is logo ownership important?
- Who owns logo design? The client or the designer?
|
Step 3: Brainstorming
You will sketch ideas for your logo - this should be a hand sketched project, no technology should be used. It may be in pencil, pen or color, but it must be your original sketch. We are going to be using the thumbnail strategy discussed in the video to the right. 16 thumnail sketeches will be required and you will need to follow the 5 steps discussed in the video when creating your thumbnail sketches. |
|
Step 4: Creation, Explaination & Recreation
You will design your logo in Illustrator. You will be required to keep a step by step documented record of your logo process. At the end of the project you will give your step by step instructions to a peer and they will have to recreate your logo using only your written instructions. Visual aids will not be allowed. You will submit the logo that your peer created following your step-by-step instructions with the rest of your assignment.
You will design your logo in Illustrator. You will be required to keep a step by step documented record of your logo process. At the end of the project you will give your step by step instructions to a peer and they will have to recreate your logo using only your written instructions. Visual aids will not be allowed. You will submit the logo that your peer created following your step-by-step instructions with the rest of your assignment.
Grading Expectations for Personal Logo Project:
Your project packet must be stapled together and include ALL of the following items:
1. Practice Logo (follow instructions in the video)
2. Research Paper (see general essay rubric below)
3. 16 Sketches (follow the 5 steps discussed in the video)
4. Your personal logo (see illustrator assignment rubric below)
5. Detailed instructions on how to recreate your logo. (be specific)
6. Peer recreation of your logo using your instructions. (the more detailed the instructions the better this will be)
|
| ||||
Week 9: 10/29 - 2/2nd
Thursday - 11/1: Illustrator Tutorial Presentation Project
1. Find a tutorial for Illustrator that you can do from start to finish. (remember to choose Adobe CC)
* Challenge yourself and try something new!
* This tutorial should teach us all something new.
* Remember to watch the entire tutorial to make sure it is something you can actually MASTER and TEACH!
* Once you have selected a tutorial you need to run it by me for approval BEFORE you begin working on it.
Remember:
1. FOLLOW THE RUBRIC....after you've read the rubric then proceed to step #2.
2. Try to be realistic...your tutorial shouldn't take 6 weeks to master. Find something challenging, but manageable.
2. Complete the project and MASTER the skill. You must be able to show the class how to do the skill and answer questions about it as well.
3. Teach the class how to do your chosen project without using the original tutorial.
* You will get in front of class and use the teacher computer and projectors to show your skill to the class.
* You will take the class from start to finish and answer their questions as you go thru.
* When choosing your lesson, remember that your classmates need to be able to complete it in 1 single class.
* You must have a handout for your peers and Mr. Philip as a guideline for your skill.
You will be graded on:
1. The original product that you complete using the tutorial (using the Illustrator assignment rubric)
2. The lesson you give in class (remember this needs to be able to be completed in 1 class session)
3. The handout you create for your classmates.
4. The difficulty of the skill. If you choose to show us how to create a line you will struggle on this project.
Challenge yourself and your classmates and remember REVIEW THE RUBRIC!
Remember to verify that the tutorial you choose is Adobe CC.
******We will start these tutorials Tuesday, November 6th, so use your time wisely*******
|
| ||||
Week 8: 10/22 - 10/26

Thursday - October 25th
Today we start our first Design Contest in the class! Make sure your book work is done first, and let the creative juices flow!
We did this awesome contest the last couple years and it’s that time of year again! Plus you could win some cash!
About the North American International Auto Show (NAIAS) Poster Contest:
The 31st annual North American International Auto Show (NAIAS) Poster Contest was open to Michigan students in grades 10 through 12. High school students are invited to submit 18” x 24” posters and have a chance to become involved in our world premier auto show in Detroit, while gaining experience in creative competition. The poster entries are judged by an independent panel of recognized members of the local art community. All winning entries will be on display during the public show at Cobo Center, Detroit, January 12-27, 2019; and will also be included in the official NAIAS program. Plus $6,300 in scholarship money will be awarded to 16 students.
Deadline is November 20, 2018.
Guidelines - Poster MUST contain:
Reference the links below to see the details on this contest. YOU ARE RESPONSIBLE TO REVIEW THE CONTEST DETAILS, SO YOU DON'T GET DISQUALIFIED!
Due to the time it takes to get the posters created and mailed out before the deadline. The classroom due date for this contest will be earlier than the contest deadline. I would highly recommend reviewing prior winners to get ideas.
Today we start our first Design Contest in the class! Make sure your book work is done first, and let the creative juices flow!
We did this awesome contest the last couple years and it’s that time of year again! Plus you could win some cash!
About the North American International Auto Show (NAIAS) Poster Contest:
The 31st annual North American International Auto Show (NAIAS) Poster Contest was open to Michigan students in grades 10 through 12. High school students are invited to submit 18” x 24” posters and have a chance to become involved in our world premier auto show in Detroit, while gaining experience in creative competition. The poster entries are judged by an independent panel of recognized members of the local art community. All winning entries will be on display during the public show at Cobo Center, Detroit, January 12-27, 2019; and will also be included in the official NAIAS program. Plus $6,300 in scholarship money will be awarded to 16 students.
Deadline is November 20, 2018.
Guidelines - Poster MUST contain:
- "2019 North American International Auto Show" or "2019 NAIAS"
- "Detroit"
- "Cobo Center"
Reference the links below to see the details on this contest. YOU ARE RESPONSIBLE TO REVIEW THE CONTEST DETAILS, SO YOU DON'T GET DISQUALIFIED!
Due to the time it takes to get the posters created and mailed out before the deadline. The classroom due date for this contest will be earlier than the contest deadline. I would highly recommend reviewing prior winners to get ideas.
Tuesday - October 23rd:
Today continue in the Illustrator textbooks and work through chapter 5. Finish Chapter 4 first before moving on. This is the final chapter for Illustrator!
1. Read and follow along in chapter 5. Working With Layers
2. Complete the Skills Review. (5-30).
3. Complete Project Builder 1 & 2 (5-32/533).
4. Design Project (5-34) & Portfolio Project. (5-35).
5. Save and E-mail me your final assignment files, including your Skills Review. Be sure to include your name & assignment in subject line.
6. Explore time with Illustrator / Photoshop / Tinkercad / Thingiverse if you finish early.
Monday - October 22th:
Today continue in the Illustrator textbooks and work through chapter 4. Finish Chapter 3 first before moving on.
1. Read and follow along in chapter 4. Transforming and Distorting Objects.
2. Complete the Skills Review, all parts. (4-54).
3. Complete Project Builder 1 & 2 (4-58/59).
4. Design Project (4-60) & Portfolio Project. (4-61).
5. Save and E-mail me your final assignment files, including your Skills Review (all parts). Be sure to include your name & assignment in subject line.
6. Explore time with Illustrator / Photoshop / Tinkercad / Thingiverse if you finish early.
Week 7: 10/15 - 10/19
Wednesday - October 17th:
Today continue in the Illustrator textbooks and work through chapter 3. Finish Chapter 2 first before moving on.
1. Read and follow along in chapter 3. Drawing & Composing an Illustration
2. Complete the "Assemble the Illustration" Snowball image from the chapter.
3. Complete the Skills Review, all parts. (3-66)
4. Complete Project Builder 1 & 2 (3-70/71).
5. Save and E-mail me your final assignment files, including your Skills Review (all parts). Be sure to include your name & assignment in subject line.
6. Explore time with Illustrator / Photoshop / Tinkercad / Thingiverse if you finish early.
Monday - October 15th:
Today continue in the Illustrator textbooks and work through chapter 2. Finish Chapter 1 first before moving on.
1. Read and follow along in chapter 2. Creating Text and Gradients
2. Complete the Skills Review. (2-42)
3. Complete Project Builder 1 & 2 (2-44/45).
4. Complete the Design Project. (2-46)
5. Complete the Portfolio Project. (2-47)
6. Save and E-mail me your final assignment files, including your Skills Review. Be sure to include your name & assignment in subject line.
7. Explore time with Illustrator / Photoshop / Tinkercad / Thingiverse if you finish early.
Week 6: 10/8 - 10/12
Thursday - October 10th:
Today we start in the Illustrator textbooks and work through chapter 1.
1. Read and follow along in chapter 1. Getting to Know Illustrator
2. Complete the Skills Review, all Parts. (1-80)
3. Complete Project Builder 1 & 2 (1-88).
4. Complete the Design Project. (1-90)
5. Complete the Portfolio Project. (1-91)
6. Save and E-mail me your final assignment files, including all parts of your Skills Review. Be sure to include your name & assignment in subject line.
7. Explore time with Illustrator / Photoshop / Tinkercad / Thingiverse if you finish early.
Monday - October 8th: All right, I'll toss a bone to you humor-oriented folk. In this Photoshop assignment you're going to take any image from a movie (or advertisement for it) and make a parody out of it (i.e. Lady and the Trampoline, Willie Wonka and the Lye Factory, or Fatman Begins).
The rules of this assignment are thus:
The rules of this assignment are thus:
- Take any image from a movie (or an ad or box cover) and make a parody out of it. The sillier the better!
- Please download the rubric documents below for the instructions for our Movie Parody assignment. See some examples below.
- You are required to submit two movie parody posters.
- Remember...These should look like real movie posters. You need the fine print details and each of your posters should be unique. (including the fine print information)
| photoshop_assignment_rubric.docx |

|

|
|
Week 5: 10/1 - 10/5
Thursday - October 4th:
Today continue to fly through the textbooks and work on chapter 6. First finish chapter 5 assignments before moving on.
1. Read and follow along in chapter 6.
2. Complete the Skills Review. (6-31)
3. Complete Project Builder 1 & 2 (6-32/33).
3. Complete the Design Project. (6-34)
4. Complete the Portfolio Project. (6-35)
5. Save and E-mail me your final assignment files. Be sure to include your name & assignment in subject line.
6. Explore time with Photoshop / Tinkercad / Thingiverse if you finish early.
Wednesday - October 3rd:
Today continue to fly through the textbooks and work on chapter 5. First finish 3 & 4 assignments before moving on.
1. Read and follow along in chapter 5.
2. Complete the Skills Review. (5-35)
3. Complete Project Builder 1 & 2 (5-37/38).
3. Complete the Design Project. ( 5-39)
4. Complete the Portfolio Project. (5-41)
5. Save and E-mail me your final assignment files. Be sure to include your name & assignment in subject line.
6. Explore time with Photoshop / Tinkercad / Thingiverse if you finish early.
Tuesday - October 2nd:
Today we stay in the textbooks and work on chapter 3 & 4.
1. Read and follow along in chapter 3.
2. Complete Project Builder 1 & 2 (3-27).
3. Complete the Design Project. ( 3-29
4. Complete the Portfolio Project. (3-30)
5. Read and follow along in chapter 4.
6. Complete the chapter activity, and e-mail me your final Table Vignette.
7. Complete Project Builder 1. (4-28)
8. Complete Project Builder 2. (4-29)
9. Save and E-mail me your final assignment files. Be sure to include your name & assignment in subject line.
10. Explore time with Photoshop / Tinkercad / Thingiverse if you finish early.
Monday - October 1st:
Today we start in the textbooks and work on chapter 2.
1. Read and follow along in chapter 2.
2. Complete Project Builder 2 (2-33).
3. Complete the Portfolio Project. (2-35)
4. Save and E-mail me your final assignment files. Be sure to include your name & assignment in subject line.
5. Explore time with Photoshop / Tinkercad / Thingiverse if you finish early.
Week 3: 9/17 - 9/21
Wednesday - 9/19:
1. Find a tutorial for Photoshop that you can do from start to finish. (remember to choose Adobe CC)
* Challenge yourself - You may not use FaceSwap...sorry. Try something new!
* This tutorial should teach us all something new.
* Remember to watch the entire tutorial to make sure it is something you can actually MASTER and TEACH!
* I must approve your tutorial, so see me when you think you have selected a skill to teach. Please follow these guidelines below.
A. FOLLOW THE RUBRIC....after you've read the rubric then proceed to step #2.
B. Try to be realistic...your tutorial shouldn't take 6 weeks to master. Find something challenging, but manageable.
C. Ask your classmates or see me to see if any of them have chosen the same tutorial. You may not do the same thing so teach to each other.
2. Complete the project and MASTER the skill. You must be able to show the class how to do the skill and answer questions about it as well.
3. Teach the class how to do your chosen project without using the original tutorial.
* You will get in front of class and use the teacher computer and projectors to show your skill to the class.
* You will take the class from start to finish and answer their questions as you go.
* When choosing your lesson, remember that your classmates need to be able to complete it in 1 single class.
* You must have a handout for your peers and Mr. Philip as a guideline for your skill.
You will be graded on:
1. The original product that you complete using the tutorial (using the Photoshop assignment rubric)
2. The lesson you give in class (remember this needs to be able to be completed in 1 class session)
3. The handout you create for your classmates.
4. The difficulty of the skill. If you choose to show us how to create a line you will struggle on this project.
Challenge yourself and your classmates and remember REVIEW THE RUBRIC!
I am attaching some links as resources for Photoshop tutorials, but remember to verify that the tutorial you choose is Adobe CC. You may find your own resource, but these links will at least give you a place to start. Click on the buttons below to be directed to the links.
| |||||
Below is the student tutorial files / images you will need to complete each tutorial.
You will need this image to complete Zach's tutorial lesson.

You will need this image to complete Roosevelt's tutorial lesson.

You will also need this image to complete Roosevelt's tutorial lesson.
The two images below are what your ending images should look like after Roosevelt's lesson.

|

|

You will need this image to complete Danzyk's tutorial lesson.

You will need this image to complete Chris's tutorial lesson.
|
You will need this audio file to complete Emily's tutorial lesson.
|
Here is a example of what you will be creating during Abbi's lesson. Have fun, no GIFing around. :) You will also need the pm4 file below.
| mvi_0350__1_.mp4 |

You will need this image to complete Nate's tutorial lesson.

|
This is the end image for Cory's tutorial.
|

|

|
You will need these two images to complete Kendra's tutorial.
|
Monday - 9/17:
Today we will be moving on to FaceSwap in Photoshop. :) I have included a tutorial for you to reference. This is a fun easy skill to learn. You can also reference the steps in the below document. Have fun with this, feel free to use your digital camera's. I would love to print some off for the Hall of Fame!
Today we will be moving on to FaceSwap in Photoshop. :) I have included a tutorial for you to reference. This is a fun easy skill to learn. You can also reference the steps in the below document. Have fun with this, feel free to use your digital camera's. I would love to print some off for the Hall of Fame!

|
| ||
Week 2: 9/10 - 9/14
Friday - 9/14:
Today we will watch a video around the history of Photoshop.
Your assignment is to open a Word doc and answer the questions below.
1. List 20 things you did not know about Adobe / Photoshop / or Pixels.
2. Who are the guests being interviewed?
3. How did each of them affect the making of Photoshop?
4. When done, print and turn in. The rest of the time is your explore time! Be creative! Have fun!
Thursday - 9/13:
Use your time today getting caught up. When you are caught up, use your time to explore your favorite Adobe application. Start your own independent project, this is your time to be creative! Feel free to explore the Makerbot 3D page. You will be assigned a digital camera for the year, so you may want to start taking pictures for future projects. Have fun!
Use your time today getting caught up. When you are caught up, use your time to explore your favorite Adobe application. Start your own independent project, this is your time to be creative! Feel free to explore the Makerbot 3D page. You will be assigned a digital camera for the year, so you may want to start taking pictures for future projects. Have fun!
Wednesday - 9/12:
1. Finish the Photoshop CC, Illustrator CC, InDesign video AND the assignment papers.
2. If you have completed the prior videos and your papers, then proceed to the Animate CC video and complete the following activities:
3. Create a new Google Doc titled 10 things about Animate CC.
4. Begin watching the video and FOLLOW ALONG. You will open Animate CC and find 10 skills that you can use from this video. If you want to attempt some of the things from this video you will need to find your own documents online since we do not have access to the library that is referenced.
5. This video is not a Terry White video, but it does give you an overview of the application. You are to list 10 things / skills you learned from the video. You should have a minimum of 3 sentences for each item on the list.
***Remember that this document should be a resource guide for you as we go thru each program. The more information you have the better this resource will be. We will be getting much deeper in each of these applications, we are just scratching the surface.
6. I would encourage you to attempt the skills in this video. Stop the video, practice, maybe rewind, and LEARN the skill that he is demonstrating.
7. When you have completed the video tutorial and the document, Print the document and submit. Remember to include your name, class hour and the name of the software at the top of the document.
8. If you finish and have extra time, this is your "Explore" time. Work on independent projects & practice what you have learned.
Tuesday - 9/11:
1. Finish the Photoshop CC & Illustrator CC video AND the assignment papers.
2. If you complete the Photoshop & Illustrator video and your paper, then proceed to the Terry White InDesign CC video and complete the following activities:
3. Create a new Google Doc titled 10 things about InDesign.
4. Begin watching the video and FOLLOW ALONG. You will open InDesign and do the skills that he shows you in the video.
5. In the document you created you should list the 10 things that Terry discusses and describe them in detail. You should have a minimum of 3 sentences for each item on the list.
***Remember that this document should be a resource guide for you as we go thru each program. The more information you have the better this resource will be.
6. Did I mention you should follow along with the video? As in do what Terry is doing in the video? You will have to stop the video, practice, maybe rewind, and LEARN the skill that he is demonstrating. FOLLOW ALONG means PRACTICE AS YOU GO!!!
7. When you have completed the video tutorial and the document, Print the document and submit. Remember to include your name, class hour and the name of the software at the top of the document.
8. If you finish and have extra time, this is your "Explore" time. Work on independent projects & practice what you have learned.
Monday - 9/10:
1. Finish the Photoshop CC video AND the assignment paper from Friday.
2. If you complete the Photoshop video and your paper, then proceed to the Terry White Illustrator CC video and complete the following activities:
3. Create a new Google Doc titled 10 things about Illustrator.
4. Begin watching the video and FOLLOW ALONG. You will open Illustrator and do the skills that he shows you in the video.
5. In the document you created you should list the 10 things that Terry discusses and describe them in detail. You should have a minimum of 3 sentences for each item on the list.
***Remember that this document should be a resource guide for you as we go thru each program. The more information you have the better this resource will be.
6. Did I mention you should follow along with the video? As in do what Terry is doing in the video? You will have to stop the video, practice, maybe rewind, and LEARN the skill that he is demonstrating. FOLLOW ALONG means PRACTICE AS YOU GO!!!
7. When you have completed the video tutorial and the document, Print the document and submit. Remember to include your name, class hour and the name of the software at the top of the document.
8. If you finish and have extra time, this is your "Explore" time. Work on independent projects & practice what you have learned.
Week 1: 9/4 - 9/7
Friday - September 7th:
First, finish your research assignment from yesterday before moving on.
Begin today by downloading the Terry White Photoshop CC video (10 things you must know about Photoshop) and complete the following activities:
1. Create a new Google Doc titled 10 things about Photoshop.
2. Begin watching the video and FOLLOW ALONG.You will open Photoshop and do the skills that he shows you in the video.
3. In the document you created you should list the 10 things that Terry discusses and describe them in detail. You should have a minimum of 3 sentences for each item on the list.
4. Did I mention you should follow along with the video? As in do what Terry is doing in the video? You will have to stop the video, practice, maybe rewind, and LEARN the skill that he is demonstrating. FOLLOW ALONG means PRACTICE AS YOU GO!!! I met this man at a conference last summer and he is the best at teaching Adobe - he knows what he's talking about and he makes it really easy to follow and understand so take advantage of what he has to say!
5. In the document you created you should list the 10 things that Terry discusses and describe them in detail. You should have a minimum of 3 sentences for each item on the list.
6. When you have completed the video tutorial and the document, print the document and submit. Remember to include your name, class hour and the name of the software at the top of the document.
Thursday - September 6th:
1. Complete the safety training on the classroom website homepage. Follow ALL of the assignment instructions located there.
2. When finished, create a Microsoft Word document and complete some research about the Adobe software suite.
1. Complete the safety training on the classroom website homepage. Follow ALL of the assignment instructions located there.
2. When finished, create a Microsoft Word document and complete some research about the Adobe software suite.
- Compare and Contrast the 5 Adobe CC applications
- Photoshop, Illustrator, Dreamweaver, Animate, & InDesign,
- Describe the uses and capabilities of each of the 5 programs listed above.
- You must also find a similar software for each of these 5 programs that are NOT part of the Adobe software suite. Explain which program you would recommend as an alternative, the Adobe application or the alternative?
- Complete the assignment in MLA format.
- Paper must be 3-5 pages.